We all know that a contractor can dig a hole, but do you know the benefits of doing it right? A step-by-step excavation process will undoubtedly save you time, money, materials and headaches.
Before you begin digging, you’ll want to perform a few easy tasks that will help to avoid surprises later on. First, be sure to assess the property where the pond will be located. Take note of all the existing structures and utilities. Second, using a site or laser level, determine where the high and low areas of the pond will be positioned. This gives you a better idea of any obstacles or challenges you might need to overcome when installing the pond.
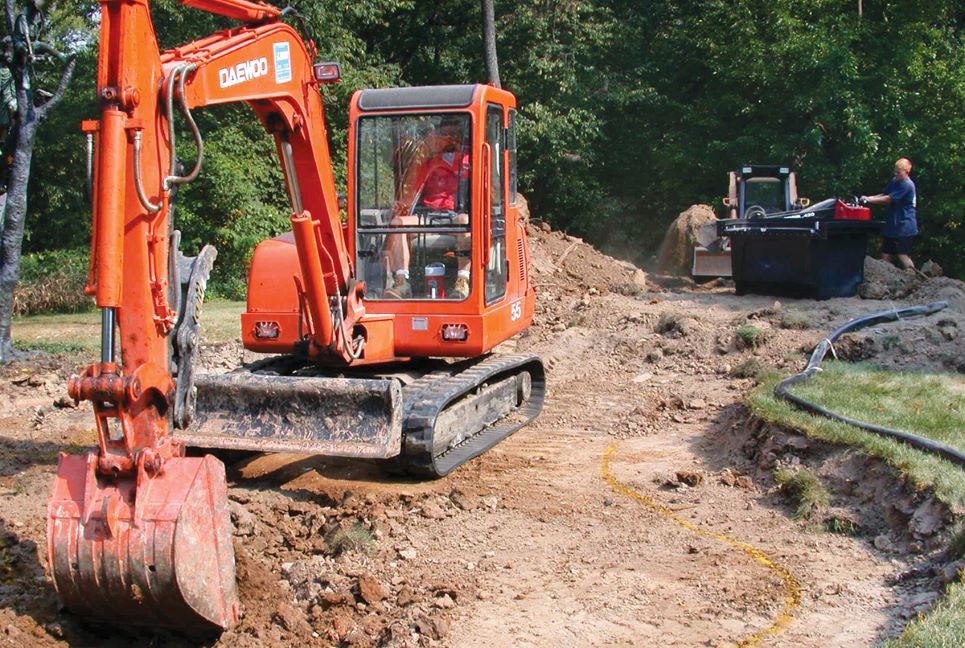
Also remember to look at construction access points for the property. This will help you determine your options for the excavation process. Are there any gates, narrow walkways or steps that might block equipment access?
Pond Excavation Site Assessment
As you walk around the pond perimeter, determine the high and low areas in relation to the main viewing area. Most ponds are located next to a patio — this would be the starting point. We like the water to come right up to the viewing area, so we typically set the water level 2 to 3 inches below the level of the patio. Once the water level is established, make the entire pond perimeter a minimum of 2 inches above the water level. At the back edge of the pond where the waterfall is located, the level should be much higher, depending on the final waterfall height. All measurements taken from this point forward are in direct relationship to the water level.

Why Your Pond Excavation Should Include Ledges or Shelves
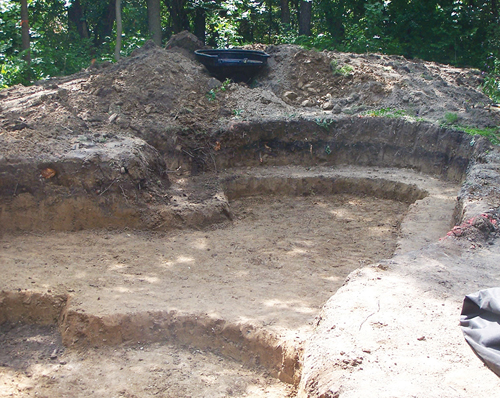
When you begin your pond excavation, be sure to include ledges or shelves along the perimeter. If someone were to accidentally or purposefully walk into the pond, you want to avoid a dangerous drop-off. Ledges act as a safe staircase, as opposed to a slippery slope. They also add strength and stability to the pond. Terracing is much more stable and less likely to collapse than a steep, tall wall.
In addition, ledges provide aesthetic appeal. If you create a proper ecosystem pond, the water will be clear, with the pond floor visible. Ledges provide layers and contours, adding interest to the pond’s interior.
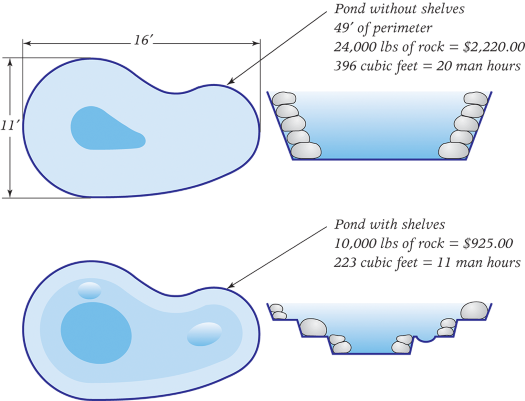
Pond ledges also provide shelves for aquatic plants; different ledge depths are perfect for planting the many different specie . For example, marginals will grow in 1 to 12 inches of water, while waterlilies and oxygenators prefer 12 to 36 inches of water.
Planning Your Ledges
The first pond ledge is typically 6 to 10 inches deep. It should be dug around the perimeter of the entire pond. Remember, this ledge should be covered in gravel, so a ledge that is 6 inches deep will become a 4-inch-deep ledge after the gravel is installed. Ledges can vary according to their usage, but they do not have to be perfect. The goal when creating a pond is to copy nature. Natural ponds don’t have perfectly level or symmetrical ledges graduating toward the bottom of the pond. When the first ledge is completed, you can mark out the next area to be excavated.
Remember that the vertical walls of the ledges will be covered with boulders or larger rocks, and the flat areas will be covered in gravel. If you will be using all hand-placed stones, make sure you keep your ledges a maximum of 12 inches tall; otherwise, you’ll be stacking multiple rocks on top of each other. This will increase the allotted amount of time for stone placement. Ideally, use one or two rocks to cover the vertical walls. If you have equipment on-site, you’ll have more freedom to use larger boulders to create deeper ponds with taller vertical walls. Your price should reflects the additional costs incurred by the increased time and materials necessary to complete the task.
The width of the ledges should also vary according to the pond design. I typically use narrow ledges that are 6 to 10 inches wide in the foreground and wider ledges of 16 to 24 inches in the background. The reasoning behind it is simple. The foreground area adjacent to the patio or viewing areas is where your clients will spend their time feeding and viewing their fish. This allows ample space for the fish to swim up close to their owners.
The background area is the zone where the pond transitions into the surrounding landscape. The wide, shallow ledges are perfect for mass plantings of aquatic plants to help with this transition. The other area that needs careful consideration is the point where the stream or waterfall enters the pond.
Determine Where the Stream or Waterfall will Enter the Pond
This is a very important section for many reasons, from aesthetics, function and costs. From an aesthetic point of view, what type of water entry point is desired? A large, dramatic waterfall or a small riffle zone? The depth of the water at this entry point has a major impact on the success of these designs. If the water is deep at this point, it will dictate the size of the boulders necessary to frame the waterfall. It will also change the sound of the waterfall, with deeper water creating base tones and shallower water making treble tones.
Shallow water at the entry point of a swiftly moving riffle area will create a natural rippling effect on the water’s surface and aid in the overall pond circulation. I typically default to shallow water near the waterfall or stream entry, because it gives you the greatest number of options.
From a function and cost standpoint, deep water near the waterfall requires larger boulders and a longer amount of time. Water quality is typically better with shallow water, as it will help with overall pond circulation and debris removal.
Building the Berm

The filters and piping are laid during the excavation phase as well. The biological filter is always set first, and the flexible piping follows. This is important for optimal efficiency of the crew. The excavated soil can be used to create a berm around the biological filte. The size should be equivalent to the size of the pond. In other words, if the pond is 11-by-16 and 2 feet deep, the berm should be 11-by-16 and 2 feet high.
If the biological filter is set higher, more soil will be needed to disguise it, and it may seem out of place. If it’s set lower, the berm will need to be more spread out in order to use the soil. Each site should be evaluated to determine how high or low the waterfall should be. Soil usage is often an overlooked part of the construction process. You don’t want to have to remove soil from a project.
If the quality of the soil is poor, organic topsoil can be brought in to be used for future plantings. The larger and broader the berm, the easier it will be to naturally incorporate plantings to help a water feature look as natural as possible.
Challenges of Poor Soil Conditions
Digging can be fun, but there are many soil types that can cause all sorts of pond-excavation challenges.
Clay Soil: Spring and fall are the best times for excavation because the clay is softer. Midsummer requires a pick-ax to chisel through the hardened clay. Clay soil in certain areas is notoriously bad. The selling price of the job should reflect the extra time needed to complete the excavation if the soil causes difficulties.
Rocky Soil: In addition to requiring a longer digging time, rocky soil brings other challenges. Among them, a hard subsurface to deal with after the digging is complete. In this instance, you can lay several layers of underlayment to act as an additional cushion under the liner. In severe cases, place a layer of the fabric on top of the liner where larger boulders will be set.
Bedrock: This is the toughest, because it takes much longer to dig than any other type of soil. Depending on where the rock layer is found, the pond may need to be built completely or halfway above grade. The deeper you can dig, the better the pond will look. It’s tough to make a pond look natural when it’s sitting 18 inches above the surrounding soil. In certain parts of the country, jackhammers are a necessary piece of equipment. It’s the only way to cut through the hard layers. It can be a slow process, but extreme conditions call for creative solutions.
Sandy Soil: In sandy, loose soils, the digging is a piece of cake. However, it’s almost impossible to cut a ledge into it. The easiest way to handle this problem is to dig the pond with a flat bottom, with the side gently sloping into the middle. Once the pond is dug, you have two options. Either place boulders on the sloping sides and put gravel on the bottom. Or, you can place boulders on the bottom and backfill behind the rocks, creating gravel and boulder terraces. Planting areas and irregular ledges can be created with this method.
Considerations for Large Projects
For larger projects of 600 square feet or more, large equipment is needed to help with the excavation, large boulder placement and material handling. Once the decision is made to bring in a piece of machinery, you can take full advantage of it.
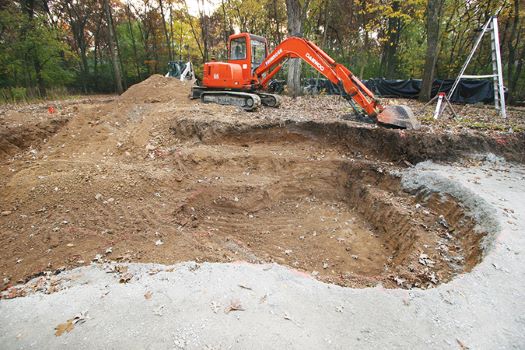
Typically, large projects run over $17,000. Skid-steers and backhoes are the two most common pieces of equipment, but cranes and loaders can be used as well. A skid-steer can be effective in excavating the top shelves of the pond, but the bottom and final shaping should still be done with hand tools. A good backhoe operator can maneuver around enough to do quite a bit of digging, but some handwork is still necessary. If you don’t own heavy machinery due to cost, you can subcontract the machine work. The cost of the subcontractor is calculated into the price of the project.
Whenever heavy equipment is involved, remember you may need additional time to repair damage to the surrounding property. At the very least, discuss the impact of heavy machinery with clients. This includes ruts and compacted or destroyed turf.
Sometimes there is a little more to pond excavation than meets the eye, but it’s still fairly basic. If you start your project on the right foot you can avoid creating extra work for yourself. Everything else will fall into place, and you’ll undoubtedly save time and money in the process.
Ed Beaulieu is vice president of field research and contractor development for Aquasacape Inc.


Your article provides excellent insights into the meticulous process of pond excavation, emphasizing the importance of thorough planning and attention to detail. It’s a valuable resource for anyone venturing into pond construction, highlighting key considerations to ensure a successful and aesthetically pleasing outcome. Well done!
Focal Point Ponds
This guide to pond excavation by Ed Beaulieu offers essential insights for anyone considering or currently engaged in the process. Understanding the importance of proper planning, site assessment, and the inclusion of ledges can significantly streamline the excavation process while ensuring a stable and aesthetically pleasing pond. It’s a comprehensive resource that emphasizes efficiency and effective project management. MCRemodeling
Thank you for the great content you shared here. concrete contractor
Thank you for sharing an interesting article. Zion Roof Pros new roof
Amazing info! Thanks for the share, https://www.myconcretecompanytx.com
Love the article. Two years ago we moved onto land that has a ‘seasonal’ creek and shallow pond that was never taken care of. It has the footprint and the potential to be absolutely amazing. Just don’t know where to start. I feel like it would be a fun DIY project to do, but also think a professional opinion would be smart as well. Any suggestions on how and what to look for when seeking a contractor?
This is a fantastic breakdown of the pond excavation process! I really appreciate the emphasis on proper site assessment and planning—taking time upfront to account for slopes, soil conditions, and access points can save so many headaches later. I’ve seen similar principles apply in home improvement, especially with insulation and foundation work. Just like ledges add stability to a pond, proper grading and sealing around a home prevent moisture issues and improve efficiency. It’s fascinating how different aspects of construction overlap when it comes to creating long-lasting, well-integrated outdoor and indoor spaces! Check out our projects at http://www.aurorainsulationcontractor.com
Really appreciate this detailed guide on pond excavation. It’s cool how much planning goes into making everything stable and natural-looking. As someone who works with nature at Yonkers Tree Services, I can definitely see how small details like ledges make a big difference. Thanks for sharing!
Thank you for sharing your interesting article.
Thanks for sharing such useful insights.