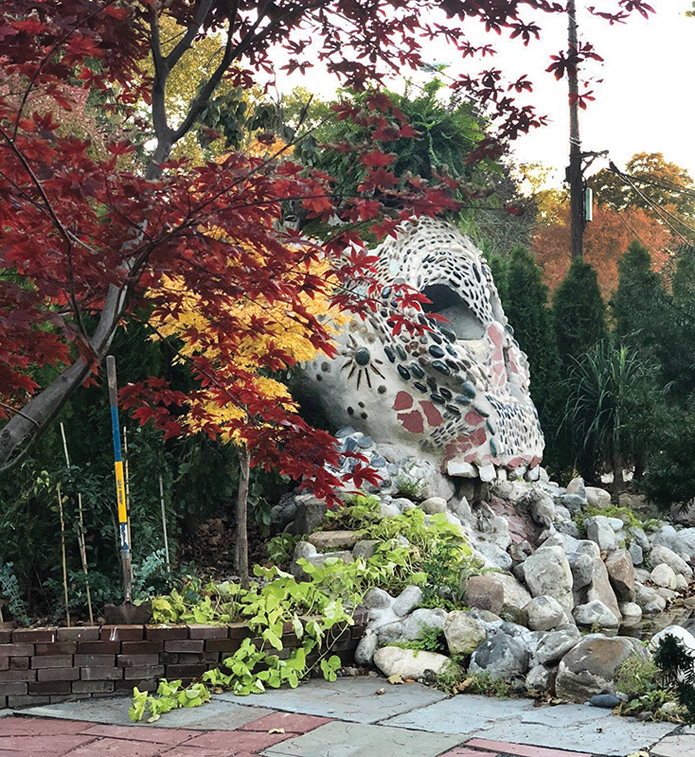
The Death Pond. Skull Mountain Fountain. Call it what you will — I just call it an interesting project. My partner Mike Hall and I met Felix Sockwell, the owner of this modern-day marvel, when our previous employer was contracted to do a rebuild on his DIY pond. A few months after its completion, he contacted the company again to inquire about bringing his latest vision to light — a skull fountain and waterfall (i.e., a neighbor frightener). It was a daunting task that seemed to keep changing shape. The one thing that was certain was that a privacy screen of arborvitaes would line his front yard, leading to a stucco archway entrance to match the architecture of the house. The privacy screen and block supports for the arch were completed before the winter shut us down that year.

While we contemplated the design, we set to work finishing the entryway arch. The previously completed block columns had exposed rebar tie-ons, which were used to secure a plywood frame of the archway. The whole thing was then covered in metal lath, skim coated and popcorned. Voila! The archway was completed. It wasn’t long until the township had issued Felix a summons complaining about the “visual nuisance structure.” They hadn’t seen anything yet.
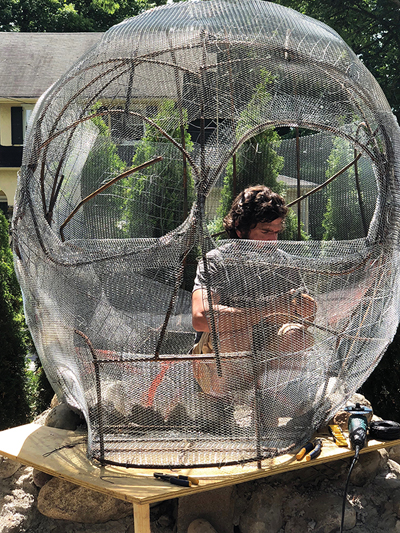
Mike and I decided we would make the skull out of rebar, lath and mortar. We would build the framework and do the pebble prep off-site as a matter of discretion, at least to let the initial shock of our rogue archway die down. We set to work, gathering stones for the mosaic, traveling to four or five different watersheds to catch wild rocks and stopping at several stone yards along the way to check out the domesticated selection. The bulk of the stones were Mexican beach pebbles of black and ivory with some river stone, slate and red pebbles. We found some offcut Belgian blocks that would do well for our teeth. The teeth were to be drilled and wired on, while the pebbles had to be sorted, cut in half and scored on the back side.
While this was happening, I set to work bending some good old No. 4 rebar into a shape reminiscent of a skull. All the rebar was bent by hand. When this task was completed, I decided to buy a rebar bender. While it would have been useful to have this tool during the bending phase, the hand-bent curves gave the framework a more organic feel. The frame then had to be tack-welded together and transported to the job site. Once positioned with a dual-action drainpipe plumbing sleeve, lath was attached to the inside and outside of the rebar framework. A few detail sections, like the cheekbones, were made at this point by folding extra bits of the lath. We then began to smear in our fiber-reinforced, Type S mortar mix. As we progressed around the skull, the rebar bender was used to add trays to hold water in the eyes and mouth.
Face Time
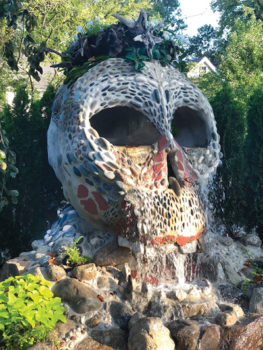
It was then time to get our pebbles on. Through experimentation, we found small batches of a 2:1 mix of Type S mortar to hydraulic cement gave us the best set time and workability. The monotony began; picking through pebbles and working in small batches, the face was outlined in pebble. The nose area and gum line were made to look fleshy with red slate. We decided to use more open designs on the sides of the skull. A driftwood crown that doubled as a planter and bird nest was concocted.
First, the general layout was fashioned on the ground. Then it was tweaked and fitted to the skull, held together with screws and single-strand, 12-gauge wire. A layer of coconut fiber lined the crown, which was filled with soil and plants. A 2-inch line of flex PVC was run from the skimmer up through the base of the skull and teed off to feed the mouth and left and right eyes, all independent of each other. To reduce splashing in the eyes, a piece of tubing swooped the output directly to the bottom of the trays. This also created a siphon to drain the eye trays, which, admittedly, was an unforeseen bonus.
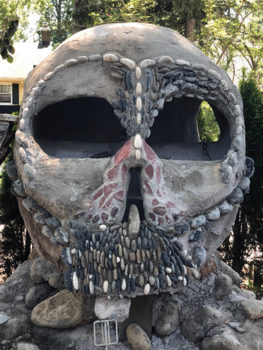
The eye trays were then clear-coated to reduce water damage. After running the skull the first time, it was found that several of our pebbles below the eyes would need to be chipped off and repositioned to prevent the formation of rogue streams. A lower jaw and collar bones were worked out and mortared together. A few stone steps were installed to ease entering the skull. The pebble mosaic was continued down into these areas, and more red slate was put in the mouth to give the illusion of a tongue. The next step was, of course, to acid-wash and clean up the disarray. Stone enhancer was applied to the pebbles to bring out their colors.
>> Related Content | A Comprehensive View of a Japanese Garden

