With all the talk about bog filtration, it seemed a good idea to discuss how we situate our pump in order to prefilter our water before sending it into a bog or other biological filter. The first step of pond filtration is called mechanical filtration, and that is what a wetland intake is — a mechanical filter. We use a wetland intake as a prefilter for the pump. Its purpose is to catch large debris for physical removal that could damage the pump or clog the biological filter too quickly. Remember that a biological filter is meant to organically digest small sediments, nutrient loads and debris.
Wetland Filtration Basics
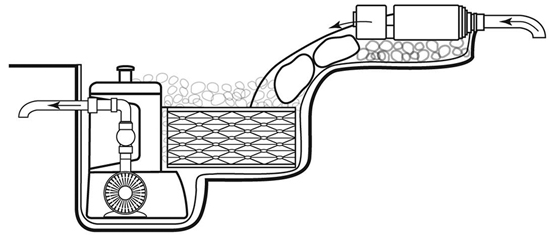
A wetland intake should be situated across the pond from the bog to create good circulation, which is a must for excellent filtration. Pond water is drawn down through stones into the wetland intake where your pump is installed. We use a 6-inch-thick layer of 2- to 5-inch round stones layered on top of small Aquablox. The round stones capture the large debris but won’t be clogged by tiny particles. Thus, the intake separates the debris into large chunks that land on top of the stones for your physical removal, and the fines and nutrients pass through for biological “digestion.”
Construction methodology is the same as it is in bog filtration. We use Aquablox to hold and disperse water. The blocks allow us to pull from a greater surface area to prevent quick clogging of the intake. Also, in this application, the stones on the surface of the intake are being used for different purposes than they are in a bog. In the bog the stone serves as a substrate for beneficial bacteria, microorganisms and plant roots. For that reason, in a bog we would use smaller gradients of gravel. In a wetland intake, the stones serve to cover the Aquablox visually, protect them from physical damage and ultraviolet degradation, and stop the large debris from entering the blocks. We use a Pondless Waterfall Vault here as the housing for the pump. The Pondless Vault is specifically designed for this use and is cost-effective for this application.
Intake Size
The wetland intake is basically a large pond skimmer and therefore has many parameters determining how big you should make it. Pump size (or sizes if you have multiple pumps), frequency of maintenance, number of deciduous trees in the area, how fast you wish the water to be drawn into the area and other environmental factors determine how big the intake should be.
On an intake that is situated inside the pond or adjacent to the pond, but still set at pond level, you can make a weir to give yourself an adjustment on the speed of the intake water. If you visualize a heavy flow coming into a 6-foot-wide intake where the water is 10 inches deep, the draw of the intake should be pretty slow.

Remember one important factor in your design of your intake. If you make the intake area very shallow, you will need to keep the feature full to that level. In other words, if you build your intake too wide with only 3 inches of water going into it, you will not have room for evaporation and water loss. When the water goes down 3 inches, it will no longer be able to reach your pumps! If you want to be able to have more fluctuation of water level, you must compensate for this in your design accordingly. Also note that larger projects may require multiple intake areas, jets or other methods to achieve optimum circulation and filtration.
The downside of a wetland intake is the same as the downside of a skimmer. The water never “falls off the edge,” and thus the tiny surface debris is never removed. Dust, pollen and anything else blowing in the wind can often create a “film” on the surface of a pond. This film is why we love to build a zero-edge to complete the “polishing” of the water!
Polishing the Water
A zero-edge is simply a wetland intake that is set below pond level. The surface water of the pond actually falls down off of a zero-edge, landing in the reservoir below. It takes all tiny particles from the surface of the water with it. By breaking the “tension” on the surface, all pollutants and visual obstructions are removed, allowing you the perfect view into the crystal-clear water of your pond! The water quality and clarity are unmatched when you add this final step to the construction process, but it does not come without a price! The reservoir size (and cost) get bigger as the feature does.
Here is where we talk about “water in motion.” In order to properly size the reservoir that is built below your zero-edge you need to understand this concept and understand it well. Pond size, the width of your zero-edge and water flow will determine the moving water on top of your pond. I’m going to make an example. Please don’t use these numbers as a formula; I’m just trying to keep it simple to understand. If you need help on a design, consult a trained professional on a case-by-case basis!
Think, for simplicity, that your pond is 10 feet by 10 feet. That is 100 square feet of surface area. Your zero edge is 5 feet wide above the reservoir below. When you turn on pump number 1 at 5,000 gallons per hour (GPH), the water in the reservoir begins to deplete as it is pumped up into the pond. The pond level will rise about an inch before it achieves “circulation” and the water is flowing back over the zero-edge and into the reservoir below. That is about 65 gallons of “water in motion.” When the pump is turned off that water will flow back down into the reservoir for storage. If you were to build your zero-edge narrower, the water would raise more in the pond before spilling back into the reservoir and the moving water total would increase. If the pump were bigger or if there were multiple pumps pushing water up into the pond that number would increase again. You would also need to add the total water in the streams to your “water in motion.” If there were pools in the stream you would need to compensate for the surface volume of those as well.
Once you have completed your calculation for total “water in motion,” you can properly size your reservoir. We use a moving water times three number. Some folks use moving water times two, but if you are off at all in your calculations it may cause you problems. Once water reaches “circulation” you want to have half of your water left in the reservoir for evaporation losses. All evaporation losses reflect in the reservoir. All other ponds will have a constant water level. When the feature is turned off, the water in motion returns to the reservoir and is captured until the feature is restarted.
Here is another way of saying it that may be easier to understand. Assume that you had all pooling areas in the feature filled up at rest. No moving water at all. When the pump went on, a series of events began to happen. Water from your bottom reservoir was being taken by the pump to get things running. 50 gallons filled up the plumbing line as it traveled to the top of the feature. Another 200 gallons were used to raise the water level 2 inches in your bog filter before it began spilling over into the stream. 50 gallons were used to fill the first 10 feet of stream bed. Another 100 gallons went into a pooling area above the pond, followed by 50 more gallons in the remainder of the stream before it started falling into the pond. The pond took 400 gallons before it finally spilled over the zero-edge and went into the reservoir. At that point you achieved circulation as water began returning into the reservoir where it originated from. 850 gallons is the total “water in motion” in this example. That amount was taken from the reservoir before it reached circulation. We would triple that amount to size our reservoir with a zero-edge, and double would be the absolute minimum! So in this example our reservoir would be 2,500 gallons ideally, or 1,700 minimum.
The downfall of the zero-edge is that it forces you to build this extra reservoir. A wetland intake at the side of the pond that is designed to allow for a good bit of water level fluctuation could have eliminated this portion of the project entirely, but at the cost of surface water quality. We use the zero-edge only when “ultimate water quality” is desired.
Flying Fish
Other potential issues with the zero-edge, like jumpers, should be mentioned. The jumpers are fish that decide
to go over the zero-edge into the reservoir below. We have avoided this by using wide drops down into the bottom reservoir. This makes the water on the zero-edge shallower and its movement slower. We also like to keep a run of a few feet of shallow water before the drop. The width of the “beachy” area, combined with the length of the shallow run, forces fish to flop up onto a shallow gravel area, travel several feet in water about an inch deep, and then flop over the edge. This deterrent can be further enhanced by creating a steep drop in pond depth directly before the beach where the water goes from at least 2 feet deep straight up to the 1-inch area. We always recommend owners of new ponds to check for jumpers several times a day for the first few days and then again during the spawn, but we have rarely had issues with jumpers…and when we do encounter them they seem to learn, hardly ever doing it more than once. Go figure!
Picking and Choosing
In closing, let’s cover how we rank filtration components if we can’t have them all on a project. We have had great results using a skimmer tied to an upflow bog. If we have to choose between zero-edge or an upflow bog we will choose the bog because we get better overall water quality. If price is an issue we will use a skimmer over a wetland intake, but only for flow rates up to a skimmer’s rating. Over-pumping a skimmer is a bad plan. Multiple skimmers are also an option, but it becomes more maintenance.
Try different configurations and different applications and let us know how well they work out for you. We offer components to our clients as “menu-style” add-ons to our proposals and find that the more you educate your people, the more willing they are to invest in your ideas! Happy Pondering!

