
Welcome back to the second half of the story of Chad’s dream pond. As I mentioned in the previous article, which appeared in the September/October 2018 issue [link here], Chad’s formal, “still” pond is mostly gravity flow with only the upflow sand and gravel filter operated with a traditional pump. I was attempting to create the most state-of-the-art pond possible.
“State-of-the-art” to me means using the least amount of energy possible for the amount of work done and creating a passively managed system with as few complicated pieces of equipment as possible. This is one of the reasons I have been using my version of the radial separator concept for prefiltration. A radial separator is an old-school settlement tank with a twist.
Traditionally the radial separator was used in aquaculture, where a constant water level can be managed. I advanced the concept with my floating circular weirs, so a fluctuating water level is possible. A 500-gallon tank can flow up to 20,000 gallons per hour with a water level fluctuation of 6 to 7 inches.
Plumbing the Tank
To start, a line was marked along the wall behind the filtration area to establish the finished water line. In gravity-flow systems, this is a critical step, and everything gets measured from that mark forward. The hole for the filter tanks was excavated, with a slab poured below ground level to support the airlift bioreactor tanks that were to be buried. A surface slab was formed and poured for the upflow sand and gravel filter placement. The 6-foot-deep, 500-gallon prefilter tank was set in a concrete slurry to conform to the shape of the tank bottom. The total weight of all four tanks when full is more than 11,000 pounds, so the slabs for each of these is 6 inches thick and reinforced with rebar. Once the tanks are set, the plumbing can begin.

Almost the entire system is designed without valves. The 4-inch drain lines into the radial separator use stand pipes inside the center chamber of the prefilter to shut off each individual drain, and the outflow from the filters is regulated by pipe size to balance the lines. The three 2-inch lines from the skimmers and mid-water drain can each have a ball valve to balance the flow if needed. For large drain-downs, the skimmers can be shut down, and the water can be drawn all the way down to the mid-water intake. The only other valves are the 2-inch outlet ports for cleaning each filter. Each filter is tied into a single 3-inch line that goes around the house and ties into the sewer cleanout for draining.
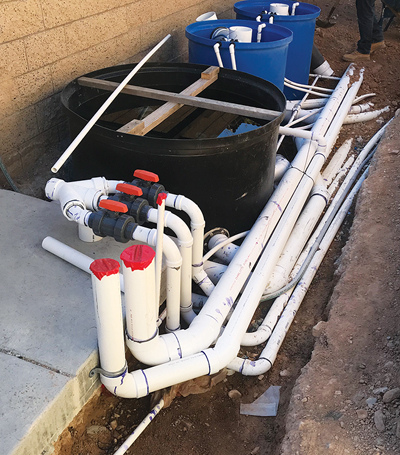
The air pump station is located inside the existing pool filter area across from the filtration. This made the electrical hookup easier, but there was still a set of eight ¾-inch air lines that needed to be organized — one for each bottom drain aerator, two for the airlifts and two for the aerated biofilters for the six 80-lpm Medo air pumps. Two air pumps are for the four bottom drains set on timers. Two pumps for the two airlifts and two more for the pair of bioreactors make up the other four. Using the same air pump for each device makes the system more reliable. If a pump fails, you can decide whether to swap it for one of the other pumps or leave it alone until a new pump arrives, depending on its designated use. For instance, the pumps for the airlifts are very important, whereas the pumps for the bottom drain aerators are less important.
Shooting the Shell
The shotcrete crew was there until dark finishing up the basic form. A week later, the Bond-Kote finish was applied. When using polyurea as the sealing surface, concrete needs at least a 28-day standard cure time before application. The surface needs to be parged smoothly, with all the roughness removed. Coating the surface with a mortar or cement mix doesn’t work as well as Bond-Kote. Polyurea has a reaction to the moisture in concrete and can pinhole during the first coat. This is dealt with one pinhole at a time, so preventing pinholes from the beginning is essential. The chemical makeup of Bond-Kote has something in it that polyurea likes, rarely creating pinholes. This makes the process go more quickly and creates a much better finish. The use of Bond-Kote speeds up the whole process. The polyurea can be applied as soon as the Bond-Kote is cured. This can often be the same day or the following day. Bond-Kote seals the chemical moisture in the concrete away from the polyurea. Paul Parszik from Artisan Aquatics applied the polyurea and was there two weeks after the shotcrete shell was formed.

Laguna Pools was to apply a 6-inch upper tile edge to the surface of the polyurea on the inside perimeter below the top cap. Not much of anything sticks to polyurea once it’s cured, so we coated the top 6 inches of polyurea with Laticrete 9235. Laticrete 9235 is a waterproofing sealant on its own, but it’s made specifically for tile and mastic installation. The Laticrete substitutes for the stainless-steel lath normally applied to polyurea as a mechanical attachment. The Laticrete was applied just a couple of hours after the polyurea was finished, which allowed them to bond together permanently. It’s a simple formula: polyurea likes Laticrete, and Laticrete likes tile mastic.
Final Assembly
While Laguna worked on the finishing touches for the pond, pool and barbecue, we assembled the components of the filters and the air pump station. Chad and I decided to add a charcoal filter to the incoming water line so he didn’t have to constantly add dechlorinator with each water change. There are two lines for filling the pond. The first is the auto-fill, and the second is a line that goes directly into the pond. This makes filling faster than waiting for the auto-fill, and I had it placed just below the surface with a schedule-80, 45-degree fitting aimed toward the surface. You know when it’s on, because it violently disturbs the surface when operating. Along with the auto-fill lines, the charcoal filter serves the power flushing lines for the filters and has a small valve at the end of the manifold as a test sample port to see when the canister needs changing.
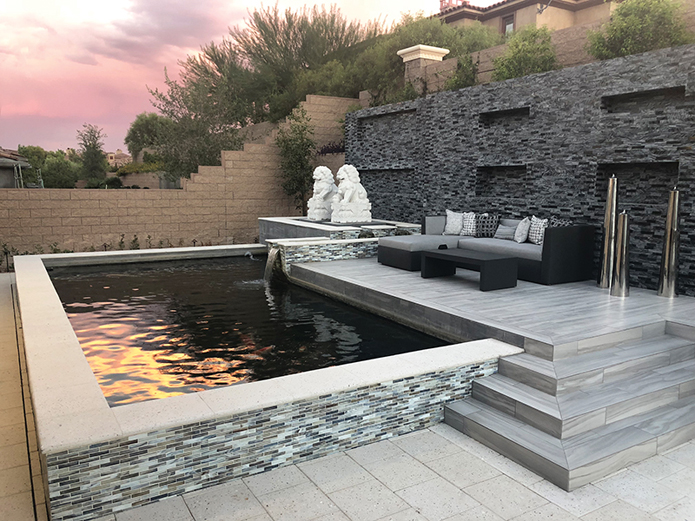
The last touch was craning in the Foo Dogs. Luckily, the lot behind the pond was vacant at the time, allowing crane access. With the Foo Dogs installed, we could start filling the pond with water. The pond ended up at a volume of 16,400 gallons when fully operational. Chad was anxious to move his fish, but with more than 15 large koi, we wanted to “kick” the system first.
I added Ponddigger beneficial starter bacteria and 1 gallon of ammonia to the pond, which shot the ammonia reading off the scale. Now we had to be patient. After about a week, we started to see nitrites. A few days later, we started to see some nitrates. Chad had contacted Shawn McHenry of Mystic Koi, who agreed to fly up and help move his fish the following weekend. During that second week, the ammonia readings started to go down drastically, as the nitrites and nitrates climbed. A couple of days before Shawn arrived, the ammonia went to zero, and the nitrites were low, but the nitrates were high.
On the last day before Shawn’s arrival, the nitrates went to zero, eliminating the need for another large water change. The daytime temperatures are at their highest in Las Vegas during August, so they moved the fish in the middle of the night, when the temperature was slightly cooler.
This was a fun project, because we made it look exactly like the original drawing Damon Lang of Green Planet Landscaping created, and I was offered the opportunity to build the functional part of the system as I saw fit. This was one of those projects that makes you feel thankful for the opportunity.
Part 1: Best Pond Practices | Drain & Filtration Design for a ‘Still-Pond’ Look

