We all want to have the best-looking ponds and water gardens with lots of beautiful, hardy waterlilies blooming all the time, but what does it really take to make a waterlily grow healthily and be a prolific bloomer throughout the entire season? A little education goes a long way when it comes to growing these majestic beauties. If you can follow a few basic rules, you will be on your way to a breathtaking display.
Hardy Versus Tropical
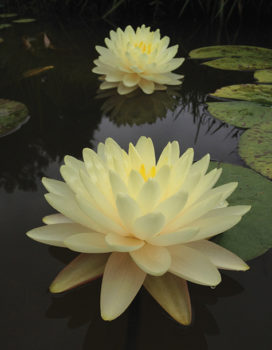
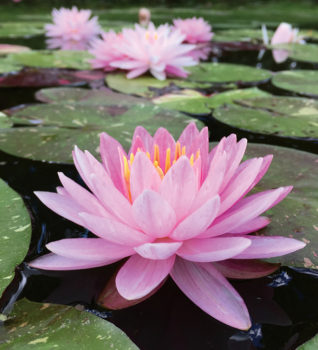
There are two types of waterlilies: hardy and tropical. There are a few major differences, the first being the plant itself. A hardy waterlily flower will bloom on the surface of the water, whereas a tropical waterlily will hold its flower high above the water’s surface. Also, hardy waterlilies are distinctly day-blooming, while the tropical species can be distinguished as either day or night-blooming. Finally, tropical waterlilies are native to and thrive in tropical and subtropical environments, whereas hardies are native to cooler climates, giving them the ability to withstand the harsh winters of some northern areas.
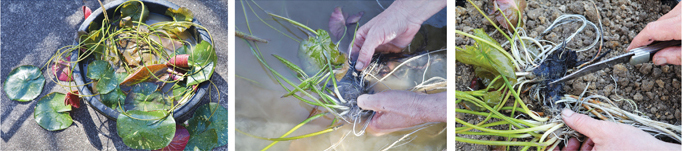
A large plant will never bode well in a small container. There will come a point when it is necessary to separate, or divide the plant in order for it to continue flourishing.
The hardy waterlilies, as the name states, are hardier and have rhizomes. They can be overwintered simply by cutting the leaves back at the end of the season and allowing the plant to go dormant through the winter months. Tropical waterlilies cannot survive such cold temperatures and therefore must be overwintered in a greenhouse. They must be pulled out at the end of the season, with the tubers cleaned and trimmed before wrapping them in a slightly moist paper towel or piece of newspaper and storing them in a cool, dark, dry location. Although similar in many ways, the two varieties also have different requirements in terms of growing and fertilizing.
[box style=”rounded” border=”full”] >> Image Gallery | How to plant, divide and feed the popular aquatic plant![/box]
A Happy Habitat
Depending on where you live, the growing season begins in early spring with the first appearance of surface leaves and finishes in early to late fall — again, depending largely on your specific zone and locality. Generally, the ideal spot for a waterlily is about 6 inches under the surface of the water. Depending on the depth of your water garden, you may have to prop up the plant to ensure it is getting enough sunlight and the water is not too cool. Remember, the deeper the water, the colder and darker it becomes. The waterlily should be in a sunny location, where it can receive four to six hours of sunlight.

Generally, this happens at least once per growing season, per plant. To do this, simply remove the container from the water. Remove the plant from the container and, using a garden hose, gently spray off the old soil, revealing the rhizome. The rhizome will need to be divided for continued growth. Locate the growth point of the rhizome, move back 3 inches from that spot and cut the rhizome with a sharp knife. You now have your division ready to be repotted. Place the cut end of the rhizome against the side of the container and fill it with fresh soil. Fill the container with 2 to 3 inches of soil, leaving the growth point exposed. Replace the container in your water garden, and enjoy!

If you’re in doubt on the container size, always go with the larger size. In terms of soil, heavy clay and topsoil free of organic debris is the best medium for growing your hardy waterlilies. If you cannot make a mud ball with your soil, or if it floats when submerged, it will not work. Never use potting soil, as it is too light. The heavy clay and topsoil will keep the waterlily anchored and ensure that a proper amount of nutrients reach the roots.
Something else to consider: even the best soil mixtures will eventually run out of the essential nutrients necessary for a plant’s growth and blooming needs. Aquatic fertilizer tablets should be used to promote flowering and healthy new growth. Always follow the manufacturer’s directions for usage.
Food for Thought
There are two types of fertilizers: tablet and granular. They both offer the same advantages, creating healthier, stronger plants that are more prolific bloomers. The only real difference is in the application.
 The granular fertilizer must be mixed in with the soil in the container before potting the rhizome. You can then supplement it throughout the season using the tabular fertilizer. If you are only using the tabular form, you will want to follow the manufacturer’s directions, but make sure to stay on a schedule of every four to six weeks. Place your aquatic fertilizer tablets a few inches from the crown and push into the soil (one-finger depth). I find it helpful to keep a journal or write it in your calendar so you can stay on a regular schedule throughout the growing season. You have to know the size of your container to determine the proper dosage. A common mistake is overestimating. If you are not sure, cut the dose in half, keeping in mind that at the end of the season, there will be less soil in the container than there was at the beginning, simply due to erosion and root growth. Eventually the waterlilies will multiply, using up all the nutrients, as they do. When this happens, it will be necessary to make new divisions.
Waterlilies are a treasure for any pond or water-garden lover and a feast for the senses. They add color, bring personality and, on occasion, give a sweet fragrance to any outdoor space. They might seem intimidating, but on the contrary, they are quite easy and self-sufficient. If you follow the few key steps outlined above, you are guaranteed to have healthy, vigorous plants for years to come.

