by Roger and Melody Sears,
Since I began building ponds more than 30 years ago, technology has come a long way. Some of the best improvements have been the skimmer and waterfall box systems. They allow for continuous cleaning of the pond surface, mechanical and biological filtration and easy access and protection for the pump.
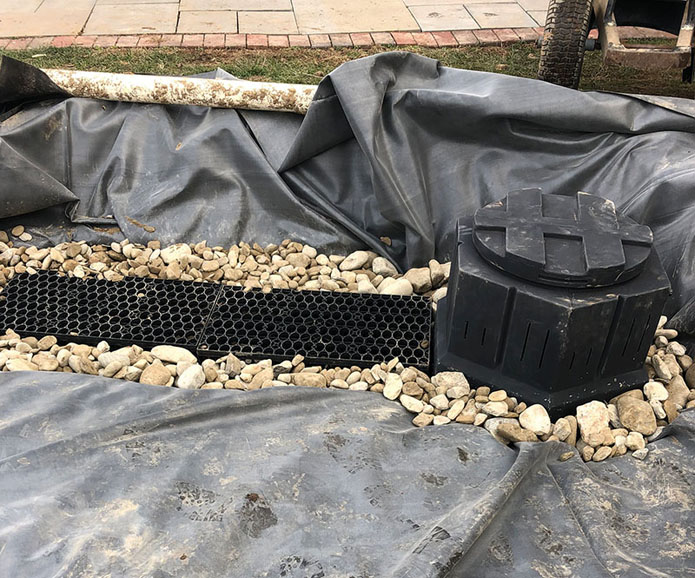
Most of the nuts and bolts, or “infrastructure” of the Flooded Skimmer, lie beneath the surface, even beneath the floor of the pond.
Although the skimmer system is vastly superior to previous filtration attempts, it brings three distinct challenges. Since skimmer boxes are built into the pond edge, it can be difficult to conceal the box and still maintain a natural look. Inevitably, the nets and plastic debris baskets wear out and break. In areas with cold winters, ice buildup can require the addition of water to prevent pump burnout. Since most skimmers have an opening of only 8 inches, they usually begin to starve the pump after a water level drop of only a couple of inches.
The Flooded Skimmer
To address these challenges, I designed what I call a Flooded Skimmer. At one end I place multiple stepping stones across the pond. The gaps between these boulders create choke points that draw and trap debris, where it easily can be netted out by the homeowner. This system exponentially increases the flow rate of water to the pump, thus reducing the concern of water loss due to ice buildup or evaporation. Since there is no skimmer box to attach to the pond edge, there are no possible leaks around the weir opening, — not to mention no nets, pads or baskets to fail, and no more awkward, faux rock lids!

What I have described so far are the benefits and challenges of a Flooded Skimmer and what it looks like in a finished pond. Most of the nuts and bolts, or “infrastructure” of the Flooded Skimmer, lie beneath the surface, even beneath the floor of the pond. The skimmer area needs to be adequate to accommodate a 12-inch-deep shelf where the matrix units and pump canyon will be sunk with enough shelf space to place the boulders, both those along the pond’s edge and the stepping stones.
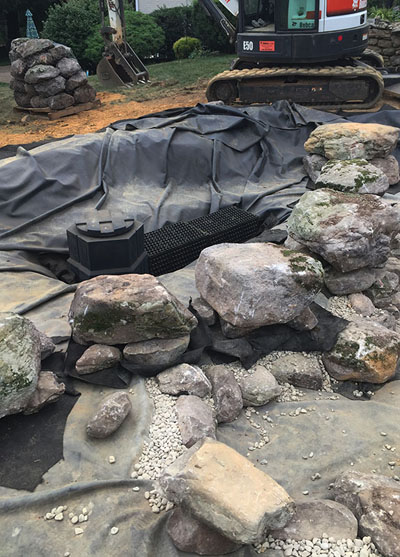
You can be creative with the size and shape of the 12-inch shelf; however I like to keep it as small as possible to allow easy access from the pond edge or from the step boulders. I have mostly adopted a two-shelf option where I can achieve 24-inch depth quickly to create the largest area as possible at 2 feet.
First, excavate the entire pond down to the 12-inch level. Position the pump canyon close to the pond edge so it can be hidden with the perimeter boulders and allow easy access from the pond edge. Then lay the matrix units flat and end-to-end, abutted against the pump canyon and 12 inches out from and parallel to the pond edge. Mark the perimeter of this area and remove the units. Excavate that area to a level where the matrix units’ tops are flush with the soil, and the top of the pump canyon is a couple of inches above water level; this is called the skimmer pit. Next, determine where the step boulders will be placed; this marks the interior edge of the 12-inch shelf. Then, dig out the rest of the pond.
Once the excavation is complete, install the underlayment and pond liner. The extra 5 feet of liner and underlayment are needed to fully line the skimmer pit. I add another piece of underlayment over the pond liner inside the pit to protect it from the matrix units and the pump canyon.
Install the matrix units, pump canyon and the pump or pumps. Use 1 to 3 inches of gravel to fill in around the voids of the matrix units and pump canyon to secure them in place. This is the same gravel I use to cover the tops of the matrix units and the entire pond bottom. When I install the pumps, I take the pipes out through the liner to the waterfall. Taking the pipes over the liner instead of through the liner pushes the liner down, exposes the pond edge to leaks and makes the pipes harder to hide. The liner needs to be thickened by placing a piece of cover tape on both sides, with a bulkhead fitting placed in that area. This will allow for the bulkhead to be tightened enough to get good compression on the rubber gasket without the liner getting twisted and creating a crease or a fold, thus eliminating the risk of a leak. If I am using multiple pipes, I use a drilled-plastic cutting board to make a backer board to further secure the liner, fittings and pipes.
Boulder in the Area
I like to use boulders that will be about 2 inches above the water level and have a flat surface for safe stepping as well. However, any boulder, or even statuary, can be used, as long as it breaks the water surface and is placed within 6 to 12 inches of the next one, creating a choke point. The water will be forced through the boulders at a quicker rate, creating a faster draw and pulling surface debris through with it. The tighter the spacing of the boulders, the greater the water velocity will be. Try to use smaller boulders to hide the pump canyon, and place them around the perimeter on this area of the pond’s edge. You need to leave an area of open water for the debris to collect and be netted out.
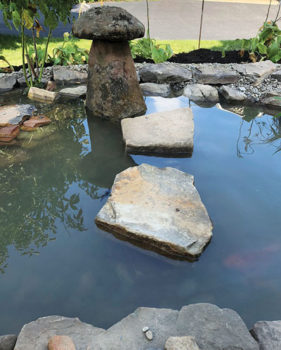
[box style=”rounded”]We replaced one of the stepping stones with a staddle stone, which was a favorite of the homeowner, left. Here’s a nice view of the collection area behind the stepping stones, right, which can be netted out as debris is drawn in.[/box]
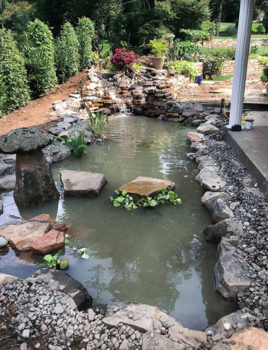
You can use aquatic plants in this area; just use ones that are more upright and not ones that spread over the pond surface. Also keep in mind, fish food may be drawn into this area, and the fish will swim in to clean it up.
Is this the perfect solution to every pond? No. However, it can be a part of everyone’s pond-building toolkit of ideas. A Flooded Skimmer is versatile and can be used with external pump systems, pressure filters and more. This gives the pond builder another option to achieve a more interesting pond.

