Do you struggle with ways to mix up the edge treatment of your water features? Are you looking to combine a patio and pond with a seamless transition? Have you been looking for a way to blend a pondless waterfall with an existing concrete patio?
If you said yes to any of these questions, you need to try using flagstone to take your water features’ edge game to the next level!
Flagstone? Really?
I know what you’re thinking. “That’s what DIY-ers do around their pond and in their waterfalls!” Yes, flagstone can look bad if installed poorly. However, I’m talking about using stacked flagstone walls to add an entirely different dimension to your water feature.
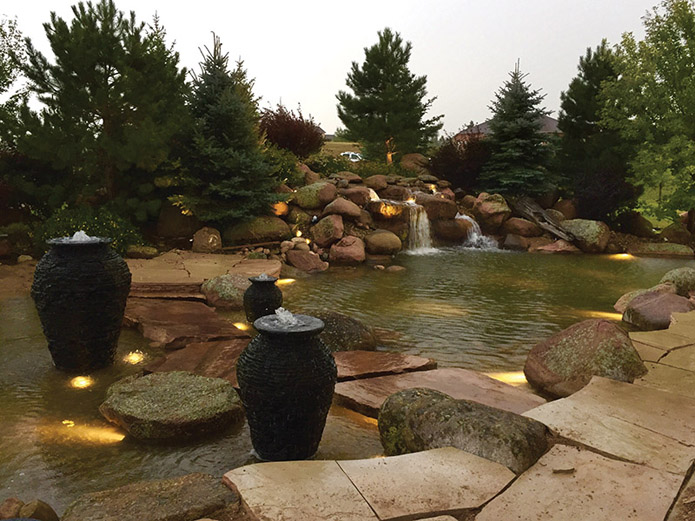
Anyone who has ever owned a water feature knows that the serene sound of water attracts all living things — especially us people! We are drawn to it and want to be near it as much as possible. By creating an outdoor living space that is part of the pond, you are inviting someone to be part of that experience.

Design & Layout
In terms of the type of flagstone, we prefer softer stones like Arizona buff because of the ability to cut flowing curves. We also use some of the more dense stones, such as Colorado buff, Arizona Red and Idaho buff.
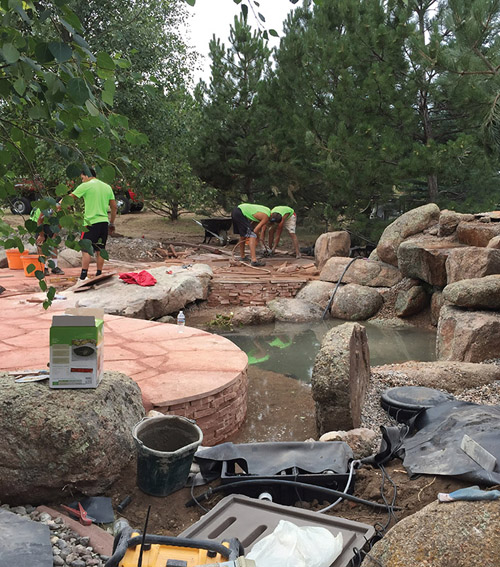
Always keep in mind that the patio should extend over the pond or stream. For the patio base, we use a structural fill made of sand and pea gravel. It compacts well and allows for quick and easy leveling. It is best to have the stacked wall curve into a boulder as opposed to serving as a liner edge. If you’re using a softer stone, design a smooth and curved edge. If you’re using a more dense rock that doesn’t cut as efficiently, you may need to make straighter edges.
Next, prepare for excavation. Allow at least 12 to 16 inches of space between the inside wall and the outer side of the wall. Always remember, it’s better to over-dig and backfill if needed. The ground underneath the flagstone needs to be as level as possible. Once the liner is in, set the boulders and paint the outer edges of the patio onto the liner.
When the liner is ready, it’s time to start breaking rock. Choose a sizable piece of flagstone with smooth and even sides. Break the large piece of stone by using the weight of a sledgehammer. Some of the pieces may need to be hit again to create smaller ones. Look for pieces that are 5 to 8 inches in length. If the pieces are too small, they will be hard to secure. If too large, they can create a hard curve.
In terms of saws, we prefer the Bosch circular saw combined with a 7.25-inch diamond blade. We’ve tried the large paver saws, but we have not been able to duplicate the tighter curves. They are big and awkward to manipulate when cutting curves. We have found that we can cut much more efficiently with the smaller saws. We use two guys to cut flagstone — one for cutting and one for spraying a small stream of water. The water keeps the blade from overheating and keeps the dust down. When using large pieces of flagstone, a second person is essential for moving and manipulating the stones.
Stack the Deck
Look for clean vertical edges that will match up evenly. If necessary, you can chip and hit the ends with a hammer. If a hammer doesn’t work, a hand grinder may be needed.
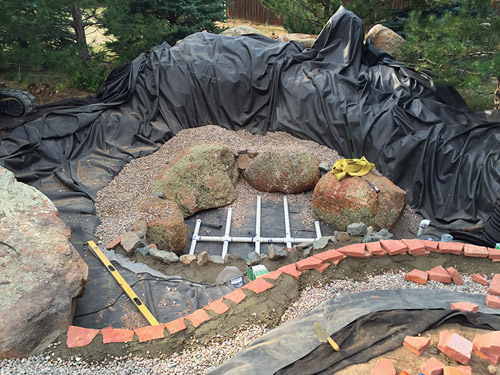
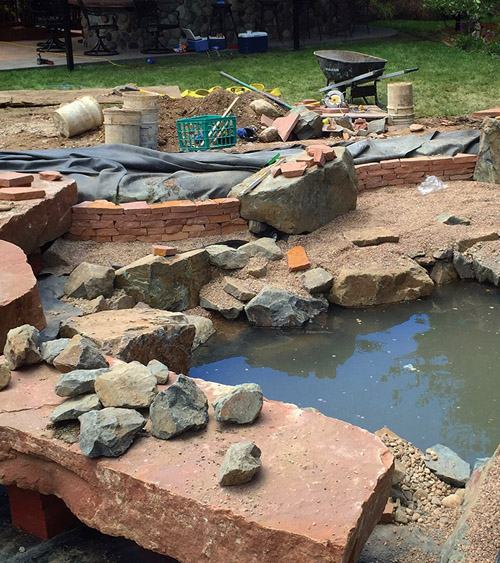
Use a thin layer of pea gravel when setting the first layer. Follow your painted line with the first layer, paying close attention to ensure that the vertical joints match up. Make sure to level the flagstone pieces as you go. We prefer to dry-stack the layers, but you can use a small bead of waterfall foam if you need the extra stability. Just as with laying bricks or setting tile, be sure to alternate the vertical joints as much as possible for a more secure wall.
After two to three layers have been stacked, it’s time to secure them into position. We’ve used both waterfall foam and concrete. If time permits, we prefer concrete for a more secure wall. However, if you are working under a time crunch and can’t wait for the concrete to dry, ample amounts of foam will hold up just as well.
Place foam or concrete along the backside of the wall. We also place concrete or foam along the base of the front edge of the first layer. Once the first layers are secure, begin stacking the additional layers and spreading the concrete as you go. It is not necessary to fill the entire area between the inside of the stacked wall and the liner wall with concrete or foam. Backfilling with pea gravel or 1-inch minus rock is our preferred method.
Next, make sure you match up the stacked wall with the predetermined patio height. This can be one of the trickier aspects of the entire process, especially if the patio’s level is dependent on an existing concrete patio. At this point in the process, the wall height should be almost level with the outer bank and leveling height of the flagstone patio. Be sure that this height is at least 2 to 3 inches above water level. If the patio is in front of the pond or stream, keep it low so you don’t block the pond or waterfall.
Crafting the Top
Selecting the thickness of the top piece of flagstone is critical, especially if you need multiple pieces that share the same wall. If you’re matching it to an existing concrete pad, the final stacking height and the top piece will need to be taken into account to determine the final height of the wall.
When you cut the top edge, use chalk or a pencil to mark the curve of the top cut. Be sure to cut through the entire stone for a clean, visible edge. Outside curves are much easier to cut.
Keep inside curves long and clean. If the piece is hard to steady, consider foaming underneath to secure it in place.
The beauty of the stacked-wall method is that it can be used on all types of water features and is not just limited to ponds. Creating an outdoor space that becomes part of the pond is a big game changer for any water garden. Stacking flagstone can be very tedious and time-consuming, but it can be well worth the effort. With a little practice, this method can be a very efficient strategy to add to your bag of edge-treatment tricks!

