A top NBA player and Olympic gold medalist had a vision of a pool waterslide. He wanted a pool oasis for his kids — one that included his dream slide into the pool. He had never seen exactly what he wanted, but he was able to describe it. He only lives at this house during the offseason, so timing was very important. We had a tight timeline to make his dream come to life. His kids wanted a cool water slide, and he wanted it to come out of a waterfall.
We met the client through his pool contractor, someone we had worked with before. Our client is a very busy athlete, so we never did get to actually meet him. Instead, we cultivated a long-distance relationship, emailing with him through his team of assistants. Soon, we understood his vision and emailed him a rough sketch of what we could do. He immediately agreed!
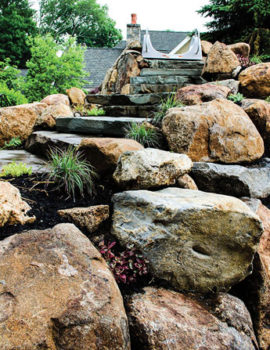
A local excavation company was used to supply the boulders. These rocks were excavated from a local development, so they easily matched the aesthetics. Our local supplier sourced the bluestone slabs that were used for the steps and diving rock.
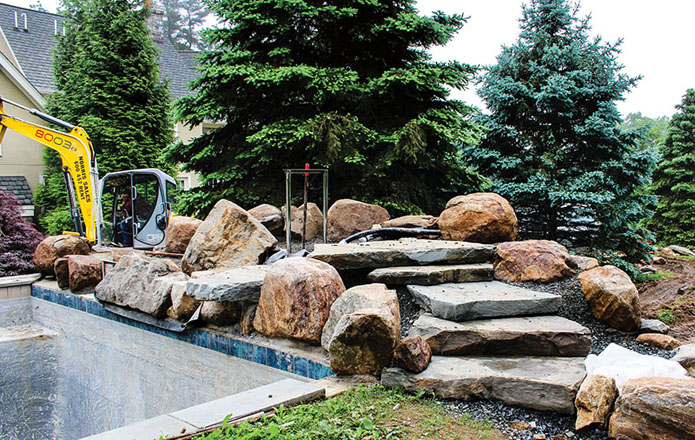
The area for the waterfall slide had a gradual slope away from the pool, which needed to be addressed. Before this was dealt with, we needed to measure everything to make sure our idea was going to fit. Only then could we proceed with the leveling.
A half-circle wall was started with large boulders dry set to create a stable base. These were stacked, and the area behind it was filled and tamped with modified stone (crushed gravel with fines in it) to create a solid foundation. Once the boulders were almost level with the pool, we poured a 6-inch pad of concrete along the pool edge. The pad came back about 6 feet from the pool edge. This was done to allow us the ability to cement down our pool-edge boulders and mount our slide hardware.
Building a Hill
At this point, we had a level surface from the pool edge to the back retaining boulders. The next step was to go vertical. When you don’t have a hill to use, you need to create one. This meant we needed to build the back and front up a row, and then fill the field.
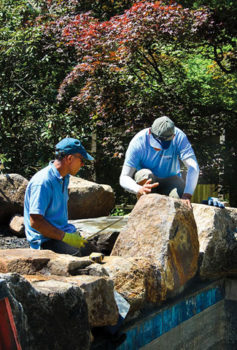
We chose to start with the pool-edge boulders. These rocks were going to set the scene, so we wanted to choose our best rocks with matching edges so we could set them close and have a uniform joint that would be mortared and pointed. Once we laid these, they were removed, cleaned and set back down in a fresh layer of mortar. This was done until we came to the stones that would make up the waterfall spill into the pool. These rocks were dry set and then set aside so we could deal with the liner.
The concrete deck in this area was cleaned and dried. A concrete prep spray was used on the surface to create a tack so that we could install our two-sided seam tape. Two rows of seam taped were installed. The rows were 3 inches apart, starting about 1 inch from the pool edge and were as long as the boulders that were going to serve as our waterfall pieces (roughly 6 feet wide). Once the seam tape was installed, we dry set the liner and underlayment. The liner was laid out so there was about 6 inches hanging over the pool edge along with enough width and length to accommodate our design. The next step was to fold back the liner, peeling one row at a time starting with the back row, priming the liner and sticking it down. At this point, the rocks that had been dry set were ready to be cemented down.
Slide Installation
This was the point when the slide needed to be dry set, with its bases anchored down to the pad. Then, we had to unbolt the slide and set it aside. This allowed us to keep setting rocks and fill so that when the slide was permanently anchored, it would have the appearance that it was sitting on the rocks. We had to bring the slide back in a few times to ensure the rocks wouldn’t keep it from going back in.

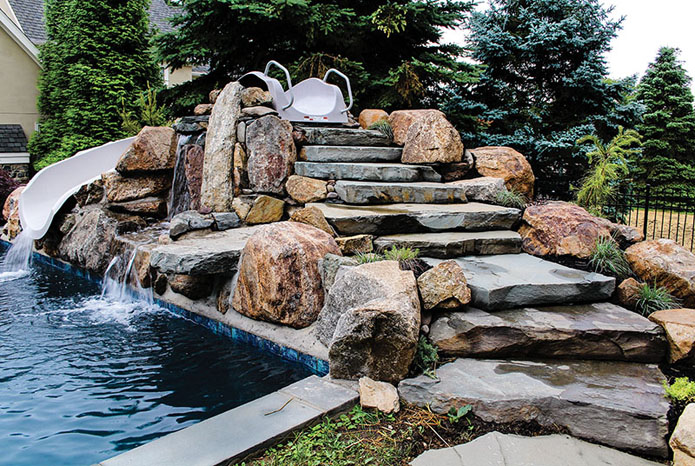
The slide was 10 feet in total length with a hard turn, and it started about 4 1/2 feet above the pool deck. This meant a set of steps needed to be installed to get to that point. I had the idea of using bluestone slabs, because they come between 5 and 8 inches thick. After the slide anchors were set, the remaining deck boulders were cemented down in place, completing the entire front edge.
The step portion was a slow process. We couldn’t go too far ahead on the steps, because other pieces had to be woven in, like the diving rock. The thickest, longest piece was picked out as our diving rock. The stone was set, with the front 12 inches extending beyond the edging boulders, so there was suitable clearance for divers. On the back end, the slab went back under one of the step slabs. Once this was dry set, all was removed, and the slab was set in cement with the stepper installed on top. This was part of my original vision. As you’re going up to the slide, you can detour and take a dive!
Waterfall Time!
This was the point where we all needed to focus on the main waterfall. Getting this done would involve three people: one in the machine and two handling and setting. Sometimes a fourth person was needed to serve as a pair of eyes between the operator and those handling the rock.
The slide would need to be temporarily installed, since the falls had to fit within the curve of the slide. I guess this is what added to the difficulty, because this was when that fourth person was most needed for machine guidance and eyes.
We chose a few hefty rocks to be the main falls. I wanted to have one nice drop into a shallow pool and then flow into the swimming pool. We did a short, fat rock flanked by a taller, skinny rock, so we could have a space where the water would originate from — kind of like flanking a biofalls, but with a waterfall scupper!
Once all the large waterfall stones were in place, the slide was permanently installed. Now we had our finished height set. The goal was to finish the detail: setting the scupper, cementing it in and attaching the plumbing to the scupper and the slide. We had to run two 2-inch lines under the area that were tied into the pool pumps. We then set all the small stones to hide the base of the slide, giving the appearance that it was sitting in this stonescape.
We only had one chance to make this right, and we were up to the challenge. Schedules had to be changed, and other pond builds were put off so we could complete this project before the end of basketball season. We finished the project on time and on budget, and the client was thrilled. A happy ending for all!

