
Streams are amazing — they bring their surroundings to life! The combination of water sounds created in a stream stands apart from the sounds of all other water features. You can have a mixture of soothing trickling, playful gurgling, waterfall crashing and relaxed babbling all in a single, flowing water feature, simply by using the proper elevation, curvatures and character rocks. Streams also lure in wildlife like no other water feature can: the deer standing in the shallows while they take a drink, the birds bathing along the surface and the butterflies and hummingbirds absorbing moisture from the wet rocks. In essence, you are creating a new oasis for life by building a stream.
How Do You Build That Perfect Stream?
The real question should be: “How do you build a stream perfect for our situation?” You have to let the feature come to life for itself based on the slope, topography, space, landscaping and the native rock and flora. You have to create the stream as you envision it existing naturally, striving to see what is not there — yet. You also have to know how a stream behaves in nature and how the water creates its own flow and direction over time. The more you study natural streams, creeks and rivers, the more capable you will be to imitate this wonder in a controlled, man-made space.

The Beginning and the End
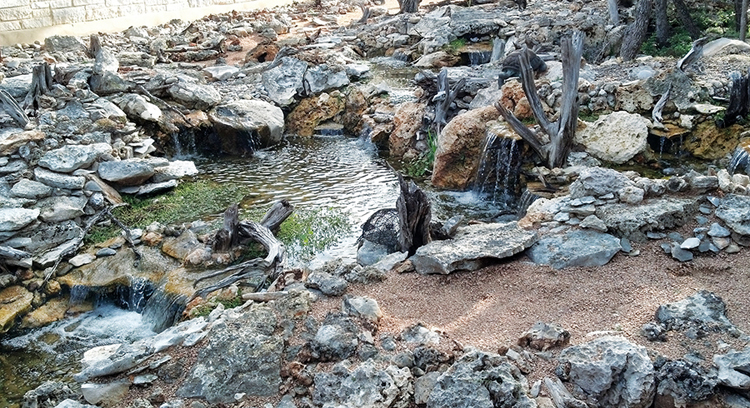
Our first key questions should center on where the stream will start and how will it finish its course. Perhaps the stream will be an underground spring bubbling up from nowhere with a soothing, babbling-brook effect through the pebbles and down a couple of short, bridge-stone drops. Maybe it will it start as a waterfall that empties into a small pool and then cascades here and there, working around a deck or patio while bringing life and beauty along with it. Or will it pour down from a higher pond, fall over a couple of ledges and drop as a full waterfall into a large koi pond adorned with a dozen of the most colorful specimens of living art? If there is no pond, you can take the stream to its end by falling off a ledge onto a pool of river rocks where it seemingly disappears, or perhaps by gradually rolling it into some gravel, watching it vanish into a dry creek bed or under a walking bridge.
The options are many, but the perfect stream has a perfect beginning and the perfect end. The location and overall purpose help us determine this.
Use Your Slope
Water flows down the hill — it doesn’t get much simpler than that! But we want to take that law of nature and make it beautiful. We want to create the correct topography and elevation for our stream so that it gives us the visual and sound we’re looking for. Each type of stream may call for a different elevation drop, but at minimum you need 2 feet of rise for every 20 feet of land to create enough slope. Keep in mind that falling water creates sound and visual appeal, so how far should it fall, and how many times? You can have beautiful falls that are 4 to 6 inches in elevation, but they are not going to give you much volume. If you drop the water 1 to 2 feet over a ledge, you will achieve much greater volume and a larger visual to enjoy. The more water that flows over the falls, the louder it will be.
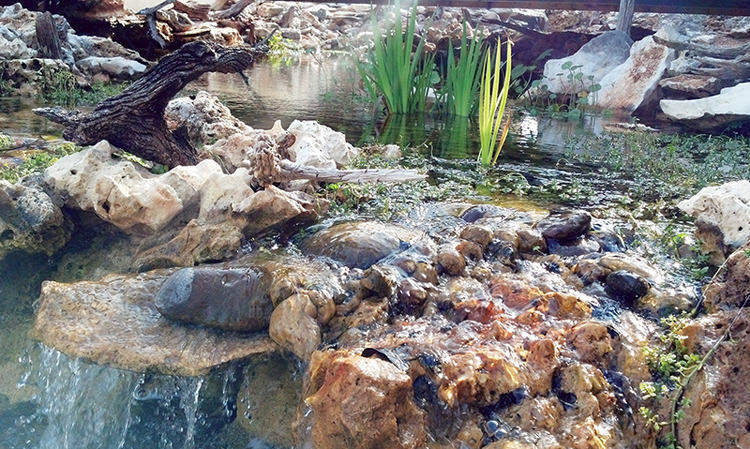
Also consider in your design where exactly you want to drop your water. Water falling on rocks will create a higher-pitched sound than water falling into a pool of water. The pool’s depth will determine the pitch and tone of the sound. We can manipulate the sounds of our stream with how we build the falls. Ideally, we will have a wide variety of pitches and volume by incorporating short, rolling falls, higher drops, gurgling twists and different depths throughout the stream.
The Power of Water
Your pump selection should be based on the amount of water you need to move at key points of the feature. Much like sizing-up a pump to a waterfall and using the width of the weir or largest bridge stone as you guide, you must both fill the stream with flow and create its character. A babbling brook, which is shallow and soothing by nature with minimal, soft sounds, will require 100 to 150 gph per inch of width at your widest key point; however, a creek or stream may require 250 to 500 gph per inch of width, especially if you have to contend with some depth where much of the water flow is hidden from view. If you want to create a Rocky Mountain-like glacier flow, you could be in the range of 750 to 1,000 gph per inch of width to create the gushing effect and white water you desire.
Choose Rocks Wisely
Your rock selection can make or break your creation. You should use the material that you are trying to imitate. Look at your surroundings and use rock that is found naturally. If you are building a glacier-fed mountain stream where rocks are generally more round than flat, you need to mirror that. Likewise, if you are in limestone country, most of your rock should be flat and stacked.
The artist in you comes to life when it’s time to place your rocks. This is the essence of your stream, because your rock positioning will determine how the water flows and speaks to the listener. As with waterfalls, I recommend that you position your bridge stones first, followed by your edge rocks, creating a raw visual of the path the water will travel. Once that is done, and before you throw the stream bottom rocks around, pour water through your feature and see how it works. Do you like the left-to-right movement and the location and height of the falls?
When you are satisfied, you can firmly set the rocks in place. Some contractors like to dry-stack, while others prefer mortar. Personally, I prefer to use canned foam to hold my rocks in place because it’s less toxic, softer and not as harsh on the liner — not to mention the fact that it makes it much easier to remove and adjust rocks if you need to, or make repairs down the line if the situation presents itself. Regardless of what material you choose, you will definitely want to set your key formation rocks in place. The rocks on the stream floor are more often tossed in the stream and dry-stacked as needed.
The Supporting Cast

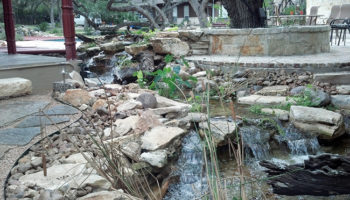
Natural streams are not just about rocks. There is a huge opportunity to use driftwood and plants to bring life and realism to your project. Driftwood can work well within streams if placed correctly. Logs and tree stumps placed in their naturally assumed locations are worth the effort for the value they add. Plants grow in and around shallow waters, so you should consider how to incorporate the gravel in your streambed and surrounding your edges. Again, to do it correctly, you need to know where plants grow naturally — on the inside curves, at the edges of waterfalls, along the slowly moving waters and at the shore where the water splashes. Keep in mind that you want this to look natural, so you will likely landscape your stream with rocks and other materials several feet outside the flowing water’s path, making the stream area complement the surroundings.
For your personal enjoyment, do not miss opportunities to make the stream feel at home with a bench, a birdhouse and statuary or pond lighting in locations throughout the stream. Puck lights do an amazing job at lighting up the streambed and couple nicely with spotlights properly hidden behind rocks and waterfalls to extend the evening hours of peace beside the meandering waters.
Finally, Enjoy Your Creation
Your perfect stream is now flowing beauty and life into a previously dry world. It rises from the ground and returns naturally; between these two points, it dances around rocks, crashes down falls into cooling pools below and rises again with refreshing splashes of joy. It serves as a new oasis for flora and fauna, and above all else, it brings you a smile and a peaceful heart, calming the spirit with its beautiful sound and rejuvenating presence. It is as if it belonged there all along — and maybe it did. It just took you building it in order to bring it to life.
of the creek. Make sure to landscape around the water feature to bring it all together and make it look like it has been there all along.
Photos courtesy of Mark Maleski, president of Water Features of Texas. Building waterfalls and streams since 1999, he creates water features that are second to none in
authenticity and “wow” factor.


Simply GORGEOUS!!!!!
Howdy, who was the designer/builder of the stream at Fort Sam Houston?
Water Features of Texas, owned by Mark Malesky, designed and built the feature at the Wounded Warriors Center at Fort Sam.
Toby,
Thanks for the question. Water Features of Texas did the design and build. They are based out of San Antonio/Boerne, Texas.
A very interesting article. Now, how can that be scaled down to build a mini waterfall, stream and pond in a fairy garden. For instance: What sized pump will be needed to keep a small stream of water flowing over the water fall and into a stream or pond below it. How many gpm will this require. Most mini pumps I have found have output flows of 60 gpm up to 400 gpm or more. What size tubing will be required to return the water to its source, say about 2 feet above the pond or stream?
I sure would appreciate an estimate on the above questions.
Thank you for considering the request. My daughter is waiting for a reply so she can put me to work on the project.