During the various stages of building a water feature, do you ever have trouble visualizing the details that will set your feature apart from the crowd? It’s OK — most of us do!
After building naturally inspired water features for several years, studying natural water environments and learning from some of the most artistically talented pond builders in the industry, we have identified a handful of design elements that we now look to incorporate into all the water features that Aquatic Edge installs. And the cool thing is, these are mostly simple techniques that can make a large impact in the final product.
Here are five tips to help you focus on the little details that will make you a more artistic pond builder:
1. Dig with Purpose
Beyond the basics of marking utilities and working safely around equipment, you can dig with an artful eye as well.
Another tip that may help your creativity flow toward the final design is to over-dig the perimeter shelf during the excavation process. This will help you by providing more space to set large and small-edge boulders in a creative manner. A basic shelf will limit you to using similarly sized boulders in a predictable pattern, which can lead to the uninspiring “pearl-necklace effect.” You will need to be sure to have ample liner, as using larger rocks and additional contours will greatly increase the liner requirement.
2. Get Naturally Inspired
We use this term quite often, as it clearly explains our mindset and design style when we are working on installation projects. What does it mean?
It means that we understand the compromise that exists between natural and man-made. A natural stream in the woods is a beautiful thing that inspires unending creativity, but in many cases, there are visual details that just won’t work in a residential backyard setting, such as overhanging dirt banks, eroding shorelines, invasive vegetation and more. We need to consider that we are using man-made materials such as liner, skimmers and pumps that need to be hidden as well as protected from outside debris. We also have to be sure that our pond will be able to withstand some elemental beatings from heavy rain, while keeping the surrounding mulch and plant roots out of the water. So, “naturally inspired” means we are creating a beautiful water feature that contains design cues from nature but is also built with the intent of being structurally sound and low maintenance.
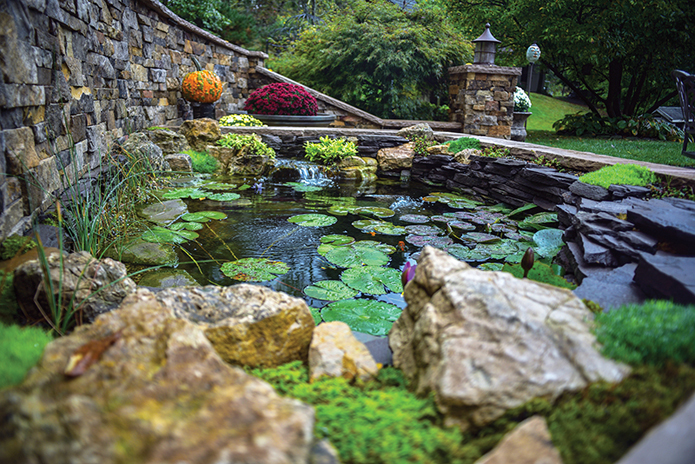
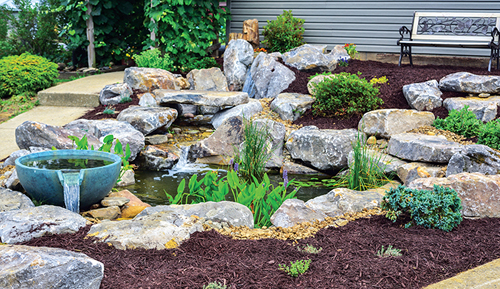
When placing boulders along the perimeter edge of the pond, the easy and sometimes subconscious thing to do is to place each boulder side by side so they appear to fit together neatly. For a basic installation, there’s nothing wrong with the technique. However, if you want to add an artistic touch, try nestling some rocks together. This accomplishes two important design elements. First, it adds dimension to the pond perimeter without taking up too much extra room. Second, it aids in hiding the seams where rocks come together. I’m not a fan of bottom seams. If I can see where a boulder touches the ground, it often looks unnatural. You have to be mindful of rock size when nestling them together. It’s best to set the larger rock first, then one or two smaller rocks in front to get the proper effect.
A perfectly executed, naturally inspired design can be a thing of absolute beauty. But sometimes, the surrounding decor calls for something a little different. When the situation calls for a touch of formality, we like to add some flat-stack to the design. Flat-stack is thin flagstone and rock hammers that create a slightly structured element and lends a complementary contrast to the natural-looking boulder placement. You definitely will want to talk about this style with your client beforehand and show them sample photos, because they may not like the idea. This style also adds considerable time to the installation, so if you use it, adjust the price of the project accordingly.
3. Visualize Flowing Water
Flowing water is a true force of nature. Water cuts through solid rock over millions of years.
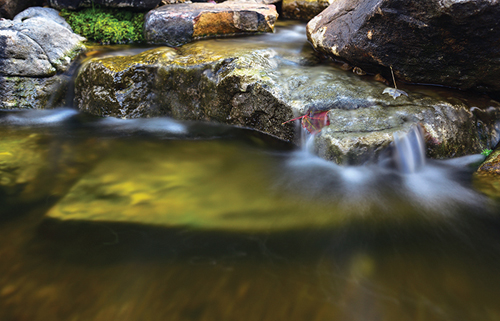
We don’t have that much time to wait for our projects, so you’ll want to pick some rocks that already have the characteristics of being stream weathered.
When your rock delivery arrives, you should take some time to pick out the boulders for your waterfall spillways, while keeping an eye out for rocks with smooth curves and pockets that you can use along the stream sides. Hard-edged boulders and square-shaped stones look unnatural in a stream. We like to pick boulders that have some sort of channel, overhang or lip, and place them in the stream so they look like the water has been flowing against them forever.
You’ll always find different sizes of rock within streambeds. Some large anchor boulders help to define direction changes, whereas a mix of small river stone and larger cobblestone will accumulate along some of the edges due to periodic deposition of stones during flood events. You can take this idea and downsize it on your projects. Steer away from straight lines of equally sized rocks on the edge — you have to change it up! Also be sure to add large cobble pieces within the stream to break up the expanse of small river rock. Cobblestones will add some character to the water current, creating little riffles and miniature eddies that accentuate the overall natural feel.
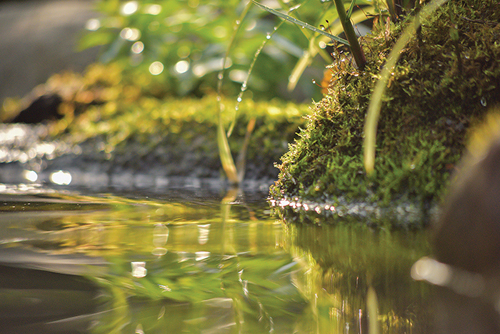
4. Soften the Edges
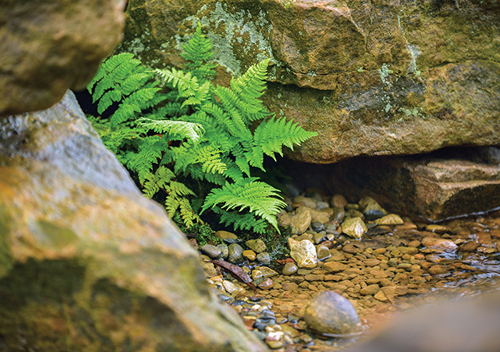
You can have the nicest rock work in the world, but all that rock can be overpowering if there are no plants to soften the look.
Succulents are great for planting in gravel pockets along the liner edge. Low-growing, shallow-water plants such as parrot feather and water forget-me-not look beautiful tucked into the seams between rocks. Moss is one of our favorites to use when hiding gaps between rocks and other awkward areas. Waterfall foam is a great base for live moss. You can also use annuals in and around the aquatic edges to add some colorful pop to the project.
In recent years, we have begun adding more aquatic plantings and edge plantings to our projects, while actively trying to sell more landscaping upgrades, because it truly makes a huge difference in the final aesthetic look. When we add landscape plantings, it allows us to walk away with a completely finished product — not to mention a great photo for our marketing material.
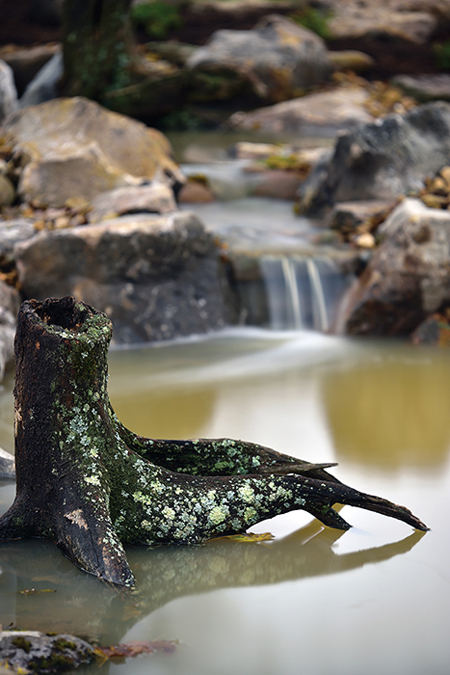
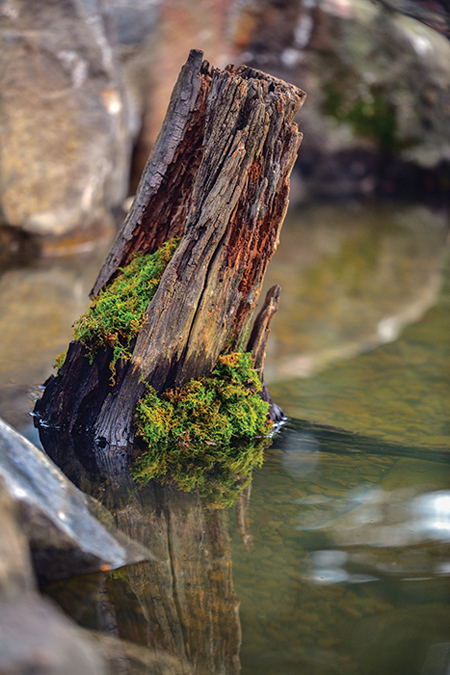
Driftwood, stumps and logs also help to soften the look of all the stone. You’re basically using these pieces to break up the straight lines of rock seams. So even though a wood element may be the same color as the rocks, you are still benefiting visually from the change in shape and texture. When you find the perfect spot for a piece of driftwood or stump, it will be magical! We like to have part of the wood element touching the water, which adds a really nice, natural touch.
Be thoughtful when selecting and placing wood in and around a water feature. It shouldn’t be rotten; it needs to have some natural character and ideally will have moss or lichens growing on it. And don’t just place a small log perpendicularly across a stream — incorporate it in a way that looks natural.
5. Stop, Look, and Listen
We like to step back and critique our own work. Acknowledging your favorite and least-favorite elements in a water feature that you personally built will make you a better pond builder. We do this many times during the course of the project. Look at the feature from all angles, just as your client will. It’s great to have a sense of urgency to complete a job and stay on task, but we’ve found it to be just as important to stop from time to time along the way to be sure we are living up to our own design standards.
Step back and look at your finished project. Find a little spot that you really like. Now, look at that same spot through the lens of a camera. I can almost guarantee that there will be a negative detail that you notice through the lens that you did not see with the naked eye. Looking through a lens confines your focus and allows you to pick up on flaws that you might not have noticed otherwise. But be careful, because you don’t want to spend too much time inspecting all the nooks of your water feature and making an unnecessary number of changes. We use this technique as more of a visual sweep to go through the design quickly, just to make sure there are no glaring issues that need to be adjusted.
The final (really final) step is to sit beside the finished project and take it all in. Clear your mind, listen to the falls and look slowly throughout the entire installation. Look for the details you implemented. Think about what you might change if you were to build it again. Go ahead and admire some of the nicer elements and point them out to your teammates. It’s not easy for everyone to notice the little details. But once they become a part of your focus, you’ll find it simpler to achieve amazing results that can set you apart from the crowd.

