Over the last several decades of designing and building water features, it has been my observation that the water feature profession is heavily weighted on the artistic side, with minimal advanced tools, technology and specialized equipment being applied. Granted, the majority of water features and garden fountains are relatively small, but at what point should a professional water feature builder look outside their normal operations for ideas that could improve their business?
>> Related Content | David Duensing’s article on how to select rocks and boulders for pond projects
Perhaps we should occasionally step back from our normal business approach and see if some of the available advanced tools could help us be more creative, efficient, effective and profitable with our time.

This is certainly not to say that one cannot succeed without aerial imagery, but I am a strong believer that the more complete and accurate data I have going into a meeting or a project, the greater the chance I have of success. Also, as my projects grew in magnitude, and accessibility to walk the site was challenging, I found that drone images helped me gather critical data that I could use in many areas of my work, including:
- Designing and preparing information for client meetings.
- Producing images that can be marked up for the client, other professionals involved in the project, my project manager and the construction crew — so that key details are accurately and efficiently passed forward.
- Confirming that the project layout is correct and actual construction details are properly covered to ensure the work is progressing correctly.
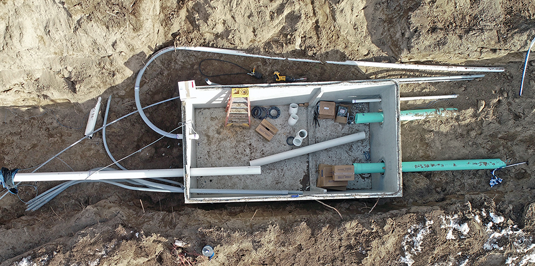
- Documenting critical details as they progress, such as utilities, vaults, valve boxes, structures, plumbing, conduits, etc., before they are covered and out of sight.
Obviously there is a financial cost to purchasing and operating a quality drone — perhaps $1,500 to more than $3,000 for a complete kit and carrying case — as well as the learning curve everyone must pass through. On the other hand, I have never questioned the acquisition costs of other quality tools in my profession, like a gas-powered Stihl or ICS stone-cutting saws, diamond blades, etc. The true value comes from having and using the correct tool in the correct manner for which it was designed and at the correct time to increase efficiency, reduce risk and costs, and improve profitability.
With that being said, I can ensure you that along with the awe and enjoyment of the flying and filming experience will come anguish, embarrassment and complete frustration when your drone disappears never to return, or when you witness it crash (which I have, more than once). With the expectations clearly defined, in this article, I hope to be able to share with you several practical uses of a drone in the design, project management, construction and documentation phases of water-feature projects.
Design Phase
In most initial contacts with a prospective client, they do their best to describe their goals and the environment where they would like some type of water feature. Since most clients — whether homeowners, general contractors, landscape designers, landscape architects, etc. — are not typically experienced in many critical details involved with properly laying out and constructing ponds, streams and waterfalls, there is usually considerable information missing from the conversation.
At this point in the process, we typically schedule a site visit, where we will use both a drone and a handheld camera (or camera phone) to capture detailed images of the entire property and proposed work areas. These images include not only the immediate area where the water feature is to be placed, but they also identify property lines, possible equipment pad locations, utilities, wells, septic fields, access points for deliveries of material and equipment, material staging areas, and so forth.
These images are immensely helpful when you’re back in the office and miles away from the project, as there is generally an overload of information discussed and collected during the initial site visit. By having these images available while reviewing surveys or construction plans of the project, you can develop more accurate options, formulate questions to research and refine the proposal and estimates for your next meeting.
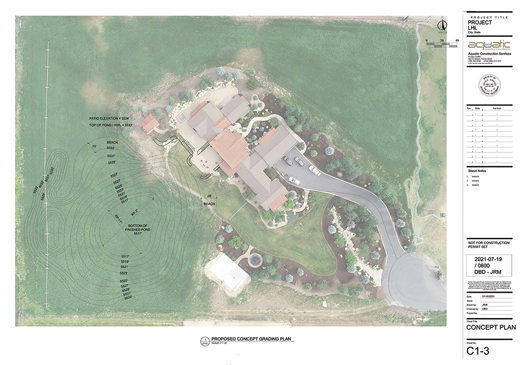
When asked to build a water feature that a landscape architect or designer has produced, we often overlay the design on top of an aerial image or mark out the pond with paint to see how well it fits into the existing space. It is not uncommon for there to be some changes made to the design shape or orientation so that it properly fits the space. On the other hand, we may determine that it is better to clear objects like trees, existing rocks and structures. Sometimes we level it all or a portion of a steep grade to make the design comfortably fit within the space.
For more expansive projects —those that extend out of sight from any one vantage point — I find that overhead images are the most effective way to evaluate the existing conditions (including trees, grades, etc.). This allows the design team, to consider, develop and present the best design options.
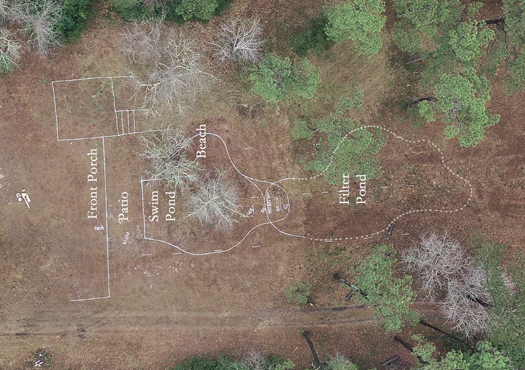
As the design develops and the layout effort begins, drone images also help to ensure that the shape, placement and orientation of the main bodies of water, along with all the key details, such as beaches, boardwalks, jumping rocks, etc., are properly located, scaled and integrated seamlessly together.
Preconstruction
Once the design is approved, but before initiating construction, several important determinations must be made. The use of a drone expedites and adds precision to:
- Confirming project layout to ensure the correct size, shape and orientation of the overall water feature and grades that exist in the immediate area.
- Identifying possible issues and challenges to the progress of work, such as utilities, trees, rocks or foundations that need to be modified, removed or avoided.
- Defining the volume of material that will need to be removed during excavation, the quantity of various materials that need to be installed during the build and the project access points and staging areas.
- Locating, identifying and securing the specific rock needed for the project.
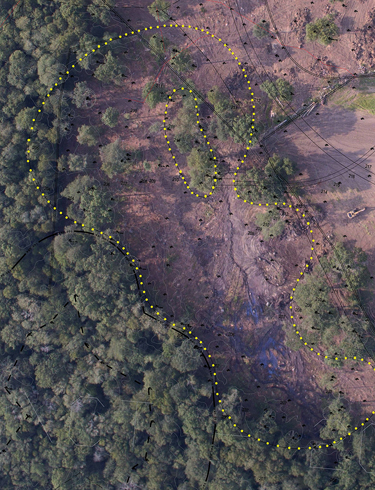
One technique used on projects that have been surveyed with the perimeter staked out is to spray paint a white or yellow dashed line at the base of each stake for enhanced overhead visibility. With this on-the-ground highlighting completed, we proceed with another drone flight to capture the overall outline of the project.
One trick I learned was that on bright days when the sun is at an angle relative to the project, the survey stakes tend to cast long, thin, straight shadows. The greater the sun angle, the longer the shadow line. Once you know what to look for in the drone image — the beginning point of the shadow at the base of the stake — it is easier to create an accurate outline of the water feature and save the step of paint marking. Unfortunately, if a portion of the project is in the shade, you may still need to highlight the stake location.
Identifying overhead and underground utilities and possible site challenges early in the effort is of utmost importance. During the site visit and photo and data collection effort, it is an opportune time to look for the existing utilities, wells, buildings, old building foundations, property drain systems, septic fields, living or dead trees and any other items that may need to be worked around or removed before construction starts. Oftentimes, if the ground by these objects is relatively flat and clear of overhead obstructions, we will identify with paint what that object is (e.g., a well, utility, etc.), and aerial imagery will capture the location of the item and the identifier.
If you can fly the drone high enough to capture an image of the entire portion of the property that pertains to your work area, also try to photograph the likely access points for delivery vehicles and material-staging areas. To be efficient and effective on a job site, it is important to confirm a good flow of traffic with easy access during construction. What better way to confirm this ahead of time than with an aerial image of the site? For contractual clarity, I submit as an addendum to the contract an aerial image that includes the outline of the proposed project, all known and identifiable construction obstacles and the access and staging points.
Construction
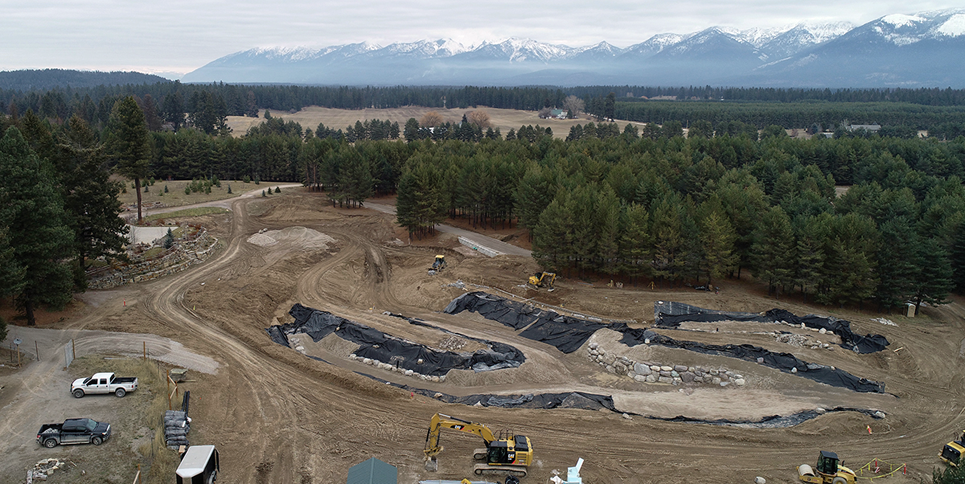
Once construction begins, the value of documenting the process cannot be overemphasized. The frequency of the documentation will be dictated by the pace of the work in progress. Aerial photos that depict a critical stage or clarify an area of potential concern have proven to be worthy of the effort, so make sure your drone is always charged and easy to get quickly in the air.
Depending on the specific project and contract payment terms, there is once again value to providing the client aerial photo documentation of specific details and overall progress being made at invoice milestones. This documentation allows the client to see and acknowledge the progress of the construction details and to confirm they were completed in accordance with the contract terms. This ability to have regular confirmation from the client that the work is being accomplished properly and on time, especially when the client is not local to the project, builds trust and better relationships. Most importantly, at the time of final payment, it leaves no question as to whether all construction details and design elements were included and properly completed.
Aerial Advice
With a few years of (both tragic and joyful) drone experiences behind me, I have few recommendations and tips I’d like to pass along.
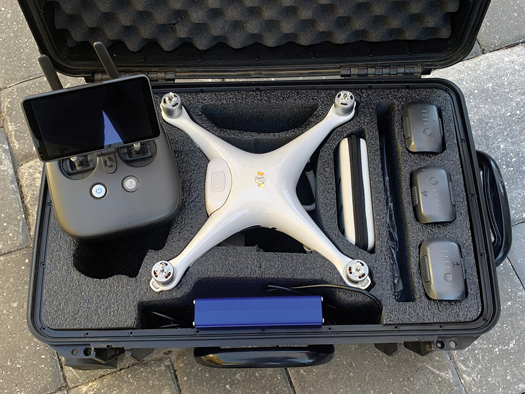
1. Size your drone for the environment and how it will be used. I use two different styles of drones: a DJI Phantom 4, which is my primary workhorse due to size and power, and a DJI Mavic for a backup, which is compact, capable and very portable. In general, drones will have approximately 20 minutes of flight time in a low-wind condition. In windy conditions, a drone will use a considerable amount of battery power just to hover in a stable location. When trying to get the entire property into a single photo, you may need to get above the trees and quite elevated. This is very important to be aware of and considered ahead of time, because winds tend to be stronger above the trees than where you might be standing.
I have experienced some very uneasy times when I had the drone above the tops of the trees and the winds began to carry it out of view. I had to very carefully fly the drone down to just above the treetops and hope I could get it back before the battery reserve ran out — which was a very real concern.
2. Buy the accessories that make the drone most useful for your application. I chose to have a dedicated screen (DJI Crystal Sky) for each of my two drones rather than use my phone as the screen. For me, I wanted a larger and brighter screen so I could see more of the details on the ground that I wanted to document. This does add several hundreds of dollars to the overall price, so you need to decide what works best for your application and budget.
Extra batteries and a portable charger were a very simple decision. When gathering details for a new project or flying in windy or cold weather, I find that I often will use two to three batteries, so I own four batteries for each unit. I typically have a spare SIM card for each drone so that once the flight is completed, or at end of the day, I can remove the current onboard SIM card, replace it with a clean spare and download the recently recorded flight images onto a remote hard drive. SIM cards come in many sizes, and since I download them often, I don’t typically use more than a 16 or 32 MB SIM card. Even when shooting video, these sizes are more than adequate.
3. Buy the insurance package and keep it in force each year. When buying a drone, whether it is your first one or not, I highly recommend buying the extended warranty and repair or replacement insurance package right away and renewing it annually. I have had a few crashes, and some were my fault — one where the drone just stopped flying, and another where the drone began circling out of control and eventually impacted a structure. In all but one of these crashes — the last one — I had insurance in force and was relatively quickly back in the air.
You cannot buy insurance for a drone that you have already been flying, or once whose insurance coverage has already lapsed. There is only a one or two-day grace period once you receive the drone, and after that period, your drone will not be eligible for the coverage — ever. Depending on the insurance you purchase, you could enjoy full drone replacement if the drone cannot be repaired, regardless of what occurred. Replacement is commonly limited to two events per year, and the insurance policy is only good for a year, but as long as you keep renewing the coverage without a gap, the coverage will stay in force.
Take Flight!
In retrospect, I wish I had embraced this technology sooner! The ease and value of aerial photography have allowed me to better manage several aspects of my business. If you are not already familiar with drones, I encourage you to test the waters, even if only to add a different dimension or viewing angle to the photos for your portfolio. I do believe that you will find it remarkable what is revealed in a photo with a slight elevation change.
Hopefully after you have read this article, you may find value in adding a drone to your water feature design-and-build tool chest. As I mentioned very early on, there is a learning curve in both the actual flying and applying the images to your business. For me, the drone has proven its usefulness in so many ways that it has become a tool I use on almost every design-and-build project I am involved in. If that’s not enough, it’s also a lot of fun! Happy flying!


Nice article. This is one of the best example of smart and quality work. I like the article and I would like to say a big thank you to you from my heart to share this article.