
When the subject of edges on water gardens comes up, I cannot help but think of the phrase “sedges have edges.” In other words, if the stems of a marginal water plant have distinct edges, you can be reasonably sure that it is a sedge.
All ponds also have edges, and each type of water garden has a set of circumstances that helps determine the best type of edge for your pond.
Think about the purpose of the pond edge. Protecting and anchoring the waterproof liner are initial considerations. The aesthetics of creating an edge that enhances a beautiful water garden and blends with the overall garden design is the fun part. It is also critical that the edge be stable and last for many years.
There are other important aspects to be aware of in pond edge design. Besides being stable and long lasting (i.e., will not deteriorate over time), it also needs to deter critters, provide entry and exit points for pond maintenance, be easily maintained, include wildlife considerations, and, most of all, be beautiful. When I mull over pond edge designs, I consider all aspects.
Something I like to promote with any edge plan is varying the design between two or three different types of edges. This reduces the likelihood of a “necklace” look around the perimeter of a water garden. This look, while often used successfully in formal edge designs, is encountered way too often among misguided attempts to edge informal, natural-looking ponds.
Lay the Groundwork for Pond Edge Design

The first step with the installation of any edge is to dig and shape the soil so that it supports the chosen designs. Water levels must be known and appropriate for any edge. Some edges allow for a wide fluctuation in water levels, whereas others look odd if the levels are not spot on.
When planning your pond, determine the edge designs before any soil is removed. Once the soil is disturbed, it is very difficult to reestablish the soil structure so that it will be stable enough to support the edge. In your pond’s design, consider where a concrete underlayment would be useful . This could be in areas where the soil is unstable, the pond is steep-sided and deep, or where heavy, large rocks may be placed. In areas where concrete is used, be aware of utility lines. You may need to create a gap to allow for those lines. Do a good job of planning before doing any digging.
Part of every pond edge design is figuring out the depth of the ledges you want to create. I am a huge fan of going to a depth of 12 inches to the first ledge. At this depth, you will deter some critters from being effective predators — in particular, raccoons. As I like to say, when a raccoon is doing a back stroke, it cannot catch fish. It is also a good depth for when a person steps into the pond to perform maintenance. If it is deeper than 12 inches, then it is a huge step!
In addition, marginal plants in pots can be set at this depth without the pot showing. This depth is perfect for most of the designs that I will be discussing. When looking at the design drawings, this depth is apparent in most of them.
EPDM-lined ponds incorporating a sloped ledge or even an entire sloped bottom can be a huge design mistake. If the entire bottom is sloped and lined with rock, the rock on the slope of the pond leading up to the edge is dependent on the rock in the deeper part of the bottom to hold it in place. If the liner is not covered with a stable layer of rock, it is almost impossible to stand up without slipping or sliding while maintaining the pond. I aim for a slight slope on the bottom to allow sediment to accumulate in a sediment basin or bottom drain, but this slope must be minimal.
I incorporate a collar of raised soil around almost the entire outside perimeter of the pond edge in all my edge designs to prevent any surface water in the surrounding terrain from entering the pond during heavy rain events. In areas with a flat landscape, there is still a grade where water will pool or run off. This water will contain both surface debris and anything that was applied to the surrounding landscape, like fertilizers and chemicals.
I cannot overstress the importance of creating at least a 2-inch raised area that is gradually sloped away so that it is barely noticeable. In areas where water normally flows, like a depression or gully, this area of raised soil will need to be higher. It concerns me when I recall the number of times I have heard people say they need to put their water garden in a low spot. This is a natural impulse, since natural bodies of water occur in the low areas. However, unless you install this collar, these can be the worst places in the landscape for a water feature.
Rock it Out
Let’s start with the traditional, widely used informal design of placing rocks down to the first ledge in the water. Rocks are placed down to the shelf and are interlocked with each other for stability.
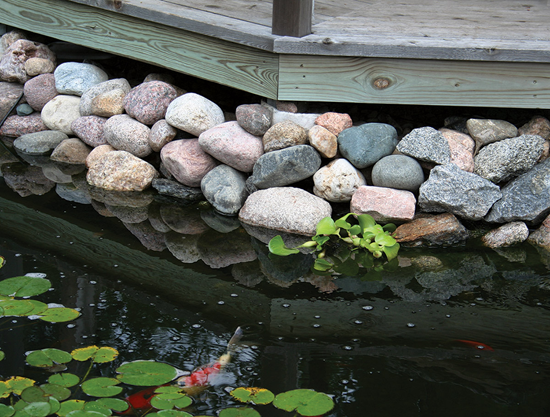
It takes some practice to become a good “rocker” — i.e., choosing and then placing the stone appropriately. Always vary the size of the stone in this design: anything from huge stones (18 to 24 inches in diameter) to small stones. You could create an upper, shallower shelf of 6 inches so that it does not take as much interlocking stone. This shelf is for just the stone. You would still want to create the 12-inch shelf below this that would not have any rock placed on it.
A hint for locking the stone in place is to use small stones among the larger ones. You could also use expanding foam or, better yet, mortar mix concrete to lock them in place. However, do not rely entirely on the foam or concrete to keep them locked. In time, even these can break away, so do a good job of locking the stones together. The stone covers all the liner along the edge so that none shows, even with some fluctuations in water level. In addition, place the lock on the turf side of the liner so that it sandwiches the liner.
You have the option of rocking the entire shelf, but I prefer not to do this. I like having a place to step when entering a pond and placing pots of water plants on this shelf. When the shelf beyond the edge is entirely rocked, these activities become a nightmare. Also, most pond plants, if planted among the rocks, will proliferate throughout the rocks. Then even the plants become a problem. An added design element is to create a place in the edge to be able to easily enter and exit the pond. Find the perfect, mostly flat stone and place it in a stable configuration so that the edge can be safely stepped on. Do this in a couple of places, if possible.
Stack it!

Another informal design that is much simpler requires the availability of more mostly flat stone. The rocks themselves do not have to be perfectly flat, but they do need to be stable when stacked. This does not take as many tons of stone. In a lot of areas, this type of stone is normally limestone, which naturally is relatively flat. If necessary, more flat stones can be stacked so that water levels can fluctuate more without seeing the liner.
A variation from this stacked design is to use human-made concrete decorative blocks of many designs. This is more of a formal design and needs to be installed perfectly flat. In almost every situation when I have used this type of stone, I laid a concrete base so that these blocks of stone will not move over time. The base is a critical element of this design.
Another critical consideration is that concrete is very abrasive to the liner. To resolve this, the concrete will need to have a protective underlayment installed over it before the liner is laid down. Any freeze-thaw cracking of the concrete that occurs over the winter is normally not an issue, since it is under the flexible liner. The very stable base really will not move very much.
Bog Edges
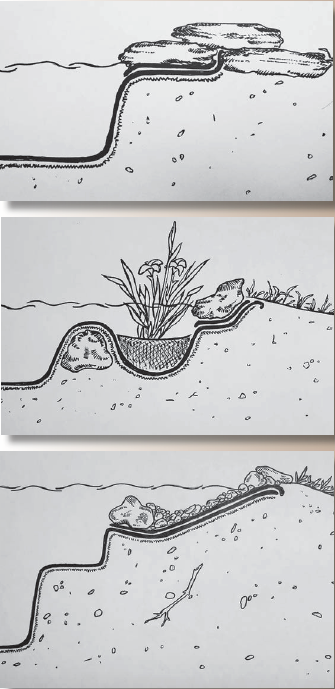
An edge design that is fun and can be incorporated into any informal design is a bog edge. This is simple to create, but water levels need to be determined exactly. Dig a pocket in the edge approximately 12 inches deep. Vary the depth depending on the plants you choose for this wet area. (In most cases, I think 12 inches is good.)
Place a raised area that is stable and made of either concrete or stone with liner overlaying it between the bog and the main water garden. This maintains the integrity of the pocket of soil that is created so that it doesn’t wash out. On the turf side of the bog, use stone to anchor the liner and cover it. The soil in the bog will need to be equal parts topsoil, peat moss and sharp sand (also known as play sand). Top the soil with a thin layer of ¾-inch gravel. I would not use any fertilizers or animal manure in this mix.
The roots of the plants need a constant supply of water over the top to keep the soil in this bog aerated. Ideally, the best bogs have plants with only a couple of inches of water over their crowns. Some plants can tolerate more water over their crowns than others. Two inches allows water levels to fluctuate without exposing the liner. Don’t use this design around the entire edge of the water garden — only on the far side, where you are not normally viewing the pond or maintaining it. This is a good example of using multiple edge designs to create interest.
A wildlife-friendly type of edge consistining of a shallow slope can be part of a good edge design, but it does have its drawbacks. String algae can grow prolifically in these areas. Wading birds, raccoons and other fish predators love using a shallow edge to enter and exit a pond. However, so many other great critters are attracted to it, so it’s worth considering.
This is easy to create and does not take a lot of effort to rock. Create a ledge or raised area of about 18 inches out of either stone or concrete using the liner to keep the gravel from sliding into the pond. This creates a small, sloped area in the edge that goes from zero depth inward about 8 to 12 inches. I recommend using this edge in combination with several other edge designs.
All ponds have edges — some that are formal, and a lot that are informal and more natural looking. Your imagination and creativity are the fun part of deciding which edge design fits best in your landscape. Whatever design you choose, just remember that your edge needs to be stable, long lasting, easily maintained and beautiful.
About the Author:
Jamie Beyer brings a lot of knowledge and enthusiasm to his profession. Jamie is a Lifetime Master Gardener from the Ames/Boone area. He is founder and President of the Central Iowa Water Garden Association. Water gardening has been a passion of Jamie’s for over 45 years. He currently has three 10,000 gallon ponds and one 27,000 pond which contains many kinds of water plants and fish.


I need help deciding what edge for my pond that was newly created. It’s a natural large pond 12ft deep and there are no shallow areas. I would love to send a few pictures and get some advice from you.
Natural pond edges are an interesting challenge but also allows the use of marginal plants actually being planted in the edge. The challenges that come to mind first are possible erosion of edge as well as invasive plants that can overtake the edge. These invasive plants can be difficult to keep under control unless you are prepared to address the issue on a regular basis.
For example, cattails are one of the most invasive in the Midwest that I am aware of. They are tall and can inhibit the access to the pond. Recognize them right away and do the controls before they take the entire pond edge over.
Erosion can be an issue if not addressed early in the pond construction. Adding a cobble like stone along the edge is popular. This will need to be done above the water line as well as below the water line for a few feet. The width of the cobble depends on the anticipated fluctuations.
Another fun way to control erosion since it is a natural pond edge is to add specific types of plants that will naturalize along the edge. These are marginal plants that are native to your area and that do not get too tall. Two good examples are arrowhead and pickeral. These are native to the Midwest and will spread along the edge. I would recommend using more than one species of marginal. These natural plant edges can also keep children from playing there thereby keeping a dangerous situation from occurring.
In natural pond edges the important aspect is to use something that allows access to the pond in at least a few places.
Controlling muskrats may need to be considered if they occur where you are at. These critters can undermine the edge in their creation of their bank dens. They also love to eat marginal plants so they can be a twofold headache to deal with.
Good luck with your pond and choosing the right edge for it.