

About a year and a half ago, I received a call from interior designer Lisa Bozak of Design Therapy here in Las Vegas. Her client was doing a backyard makeover that surrounded the back side of his swimming pool, and the new addition included a pool house with a Japanese-style tea house incorporated into the design. The client wanted a narrow koi pond surrounding the square center of the room with a floor covered in tatami mats.
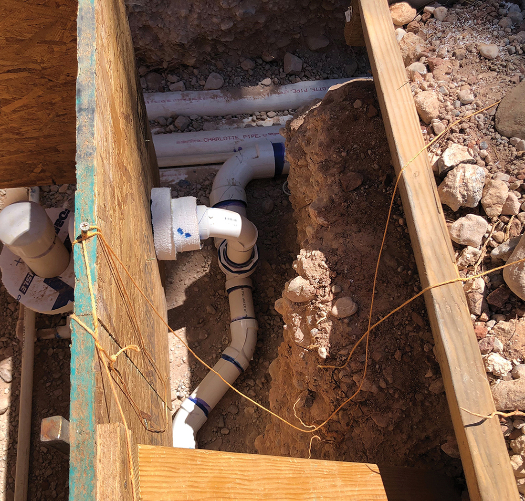
When I arrived, the foundation of the building was formed, and the layout for the koi pond was just being created. This was good timing, because the foundation hadn’t been poured yet, and no plumbing had yet begun
The pond was only about 24 inches wide inside and slightly rectangular, with each side about 15 to 16 feet long..

A small spill in the center of the back wall was the only water feature. For circulation, I decided to rotate the pond slowly counterclockwise with a gravity-flow, 2-inch return in each corner. I placed two 3-inch aerated bottom drains in opposite corners and two 5-inch aeration discs in cups flush mounted in the floor in the other two corners. An Aqua-Niche skimmer would go in the corner to the left of the sliding door for easy access.
Foam hats were used behind the forms on each pipe and in the floor to pour the concrete around. After the forms are removed, these foam inserts are dug out, leaving a cavity slightly larger than the fitting. Once the pipe is trimmed back and the fitting glued on, expandable foam is used to fill the gap left between the fitting and the concrete. Once the foam has cured, it can be trimmed back to the surface with a razor knife. Once the surface gets parged, any remaining holes or imperfections can be smoothed out. The nice thing about using expandible foam is the fact that polyurea likes it and bonds well. So, if any foam is exposed on the surface, it doesn’t pose an issue.
Filtration
Once the polyurea was applied, clamp rings were installed as mechanical clamps to prevent any delamination over time. The upper 5 inches down from the top edge were coated with a strip of Laticrete 9235 as an attachment surface for the tile that was to be installed around the upper inside edge. There is a short window of time where the Laticrete will stick to the polyurea, creating a surface to which the tile and bonding agent will stick well.
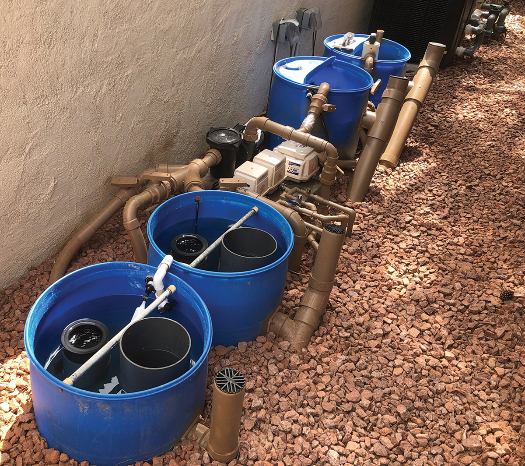
Each 3-inch bottom drain connects to a 55-gallon-drum radial separator. The prefilter barrels are connected at the bottom with 3-inch fittings and a 3-inch stainless knife valve inside one of the tanks, which is used to combine them when flushing. This allows for the use of one discharge pump instead of two when cleaning.
The auto-fill float is in one of the prefilter tanks with a separate ¾-inch valve for quick filling after maintenance. A WLim Wave 1 1/6 Horsepower pump at approximately 4,000 gallons per hour pulls from each radial separator and from the skimmer through a plenum manifold with three 2-inch valves for balance and maintenance.
The WLim pump pushes the water to two biofilters, with a third valve on the outlet side going directly to the spill on the back wall of the pond. The first filter is an air-driven dilution reactor filled with 2-inch chunks of floating Matala mat aerated with a 60-liter-per-minute Medo air pump. This filter is the pond’s real-time source of dissolved oxygen, which is required in a formal pond. The second filter is an up-flow sand and gravel filter for fines control. The 57-Watt, FlowFree UV light was placed in a down-flow position inside this tank with a small bleed hole in the top edge to prevent air from accumulating in the UV housing. The air bleeds out along with some water directly back into the filter. The water from the biofilters flows back to the pond via gravity flow.
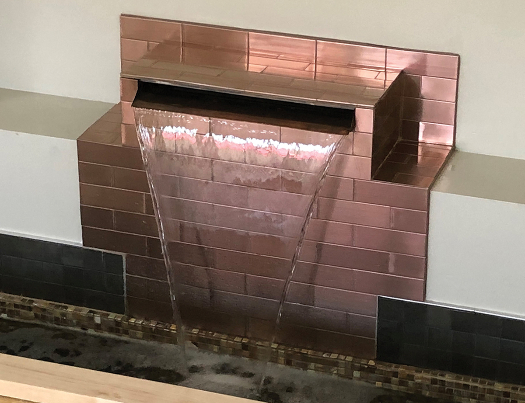
Spilling Tea
The spillway on the back wall was a little difficult. Most spills are made for pressurized flow, not gravity flow. The inlet fittings on most spills are never large enough for gravity flow. In the past, I would buy another manufacturer’s spill box and modify it. In this case, I had limited space and couldn’t find one that would work, leaving me to build one myself. I constructed the spill box using a ¼-inch PVC sheet and plastic-welded the pieces together. Because it was to be installed inside the wall behind tile, I sealed the inside with a plastic sealer coat as insurance against any bleeding at the seams over time. A 2-inch fitting was installed in the bottom with a trimmed and drilled 2-inch tee as a diffuser. An angled plate fits inside the box, directing the water sideways and back to evenly distribute the flow before it reaches the spill. I made the spill lip out of a narrow piece of copper to match the copper tiles that were chosen for the spill surroundings. The tile guys did a great job hiding all my parts and made a nice matching cover for the spill box that can be easily removed for maintenance.

Each filter empties into a 4-inch air purge chamber, eliminating any visible air bubbles before the water reaches the pond. Each air purge is reduced from 4-inch to 3-inch piping as they lead to the pond. Each of the two 3-inch lines divides into two of the corner returns at the pond. Using pipe size to divide the water flow eliminates the need for individual valves on each line for balance.
The filters and spills balanced out nicely, and when filled, the pond came in right at 2,000 gallons, giving it a two-times-per-hour turnover rate. The spill is very quiet, with the low sound of running water in the background. It should make for a nice meditation area once finished with the custom wood trim, ceiling treatment, tatami mats and well-chosen koi.

