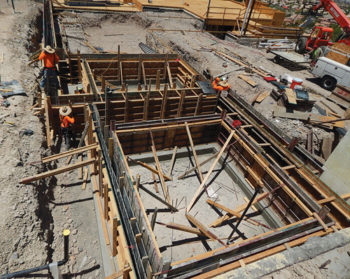
Zombie projects like this one are projects that come back to life after a long period of disappearance. The general contractor, Blue Heron, originally contacted me three years ago to provide the design and supply the equipment instead of coming in after the infrastructure was finished. The good thing about this project is that I was able to make suggestions on paper before they poured any concrete. Many of these exclusive custom homes take two to four years to complete due to the location and complexity. This home was no exception.
Fast-forward to March 2019 when I received a call from the superintendent saying they were ready to finish up and needed the equipment. Not only had this zombie come to life, but the deadline for the opening of a home to celebrate the owner’s birthday was also three short months away.

In 2016, I supplied a plumbing layout and handed it to Tim from DBR Plumbing. I was glad to see Tim on the job, because he and his crew have done several koi pond-plumbing installations I’ve been involved with, and he knows what I need in terms of fittings — all drain waste and vent 90s and 45s, including all my penetrations.
Filter Layout
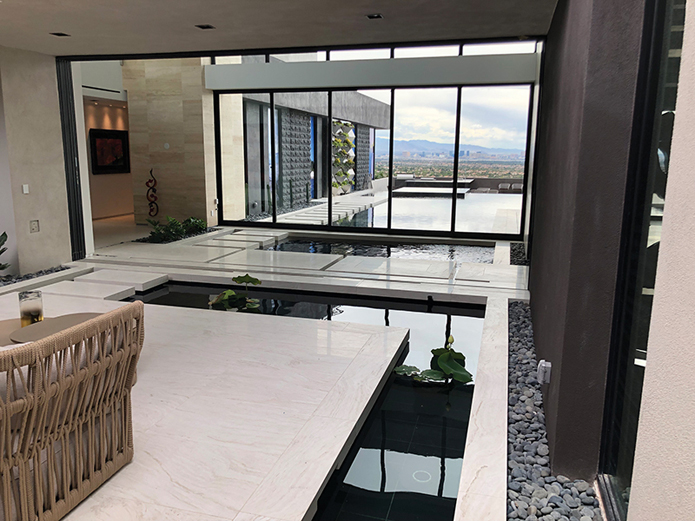
Seeing through the eyes of the architect, I’ve always enjoyed formal ponds’ artistic connection to a home. My job is to make as few recommendations as possible, leaving the aesthetics to the owner and designer and supporting their vision. This project was no exception, with my only issue being the water wall. We agreed that it should not be part of the koi pond circulation because of maintenance and the need to keep the clean, contemporary look of the wall against the pond and interior of the home.
Given the shape, at approximately 2,800 gallons, the pond would need two 3-inch bottom drains and two skimmers to properly remove water from the pond. Each bottom drain would have one 5-inch fine bubble diffuser mounted in the center of the dome cover. Gravity flow to the prefilter was not an option, given the location and 150-foot distance from pond to filter area. All pool and pond equipment components were to be placed in an area on the east side of the home. I would need at least eight returns to navigate the corners and niches in the angular design. I decided on four 2-inch return lines, each split into two 1.5-inch returns at the pond, except for the return below the water wall. This was a long, narrow space, so I chose a single tapered, adjustable AquaStar radial floor return that would spread out the water in all directions.
A shallow trough runs along the west side of the pond to the right of the water wall. This was handled by one 1.5-inch return with a street 90 elbow aiming the water through the narrow trough toward the steps on the north end near the sliding glass doors. The other return from this 2-inch line was near the floor on the opposite side of the water wall, with a street 90 elbow aimed away from the water wall toward the drain on that side. Two steppingstone blocks cross the pond from the hallway to the pond’s center island, extending the path of the steps from the swimming pool across the interior reflecting pool and into the koi pond. We placed 1.5-inch returns in each of the three gaps between the side, steps and center island. One 2-inch line feeds two of the 1.5-inch returns. Another 2-inch feeds the third return between the steps and a 1.5-inch return below the steps. An adjustable 1-inch eyeball is installed on each of these returns. To pass code for egress, one small, unobtrusive block was installed as an underwater step. No underwater lights were needed, because the overhead lighting provided enough to pass the requirements for the minimum number of lumens for downlighting required by the pool code.
Equipment Integration
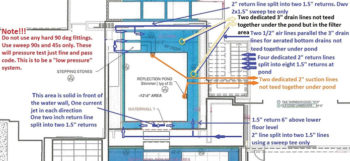
The two bottom drain lines, two ¾-inch air lines, two 2-inch skimmer lines and four 2-inch return lines were all plumbed to the filter area as separate pipes with no tees or hard 90- degree fittings anywhere in the runs. Three years later, I handed Tim from DBR Plumbing a photograph of another project completed a few months earlier with the same filter layout requirements needed here. That was all he needed to stub up the piping in the positions necessary for Hector Mardueno of Stonewall Creek to install the equipment.
Because of the layout, all the equipment needed to be pressurized. Both bottom drain lines connect to the intake of one LWS Static Suction Pre-filter (SSP) on the suction side of the pump, operating at 1/2 inch of mercury. The pump pulls water from both the SSP and the two skimmer lines and delivers it to one of my Low-Pressure Bioreactors (LPBR), which produces less than ¼ pound of pressure on the return side, making the system very efficient. An Intelliflow variable-speed pump was used to make the final flow rate adjustable due to the piping dynamics.

One LWS 87-watt ultraviolet light is mounted on one of the return lines and buried vertically into the ground. The autofill is electronic and located in the filter area with a balance line and a water line both going to the pond. The balance line is covered in the pond with one AquaStar 8-inch drain cover and a modified adaptor for the 2-inch line. The ¾-inch water line is capped with a gray insert and perforated cover I machined myself.
The koi pond blends effortlessly into the home and other water features. A continuing theme of water from the upstairs entryway reflecting pond flows down the water wall, leading the eye to the koi pond as you cross the reflecting pool through the center of the home and toward the swimming pool. This creates a beautiful, seamless flow, proving this zombie project was worth the wait.

