
When Lindsay and John asked us to create an entertainment area in their backyard, we decided to create a series of steps, landings and patios—horizontal planes that took advantage of the topography. The biggest challenge we faced was access; the only way into the back that was accessible to the skid-steer, which we needed to move the largest stones, was through the narrow passage along the house that we would be building the steps into. Thus, we had to stage materials carefully to avoid blocking our way out.
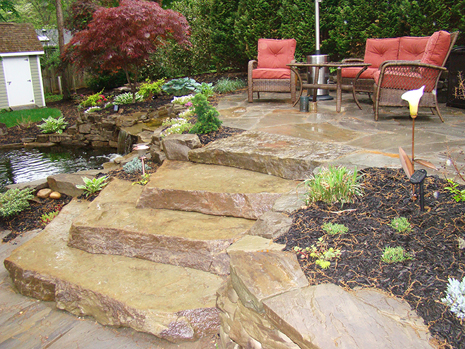
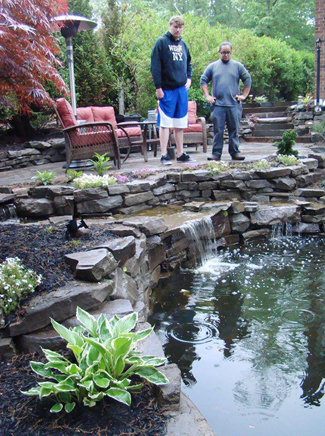
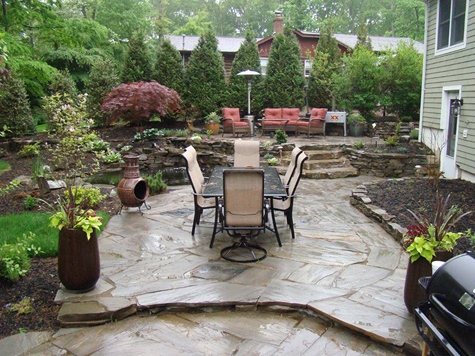
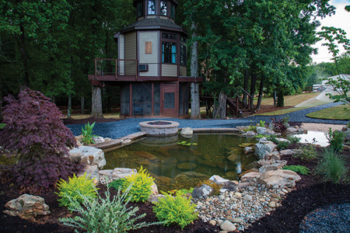
We designed a series of geometric patios for the Swaine Project, each with a specific purpose. Lindsay wanted a sunning area so we built a stone circle, 14 feet in diameter and down low for privacy, for lounge chairs on the sunny side of the yard. We balanced the sunning circle with a 14-foot pond on the other side of the 15-by-30-foot center patio for their dining area. Four large stone steps, the largest 7 feet wide, lead up to a small upper patio where a small group can sit overlooking the pond. 10 more wide stone steps lead to the front, flanked by tiered gardens to soften the house wall.
 John selected silvery Tennessee Crab Orchard flagging for the patios—large, irregular pieces up to 5 feet long—complemented by a warm brown Pennsylvania Karney Stone for the walls and steps. The semi-natural style acknowledges the strong geometric shapes while still evoking the charm of natural stone dry walls.
John and Lindsay were great to work with, giving us complete control after the design was approved, which resulted in a number of impromptu enhancements, like the stepped waterfall that spills water off into the pond and down the steps at the same time.
Construction
John lent a helping hand in the deconstruction of the existing concrete back stoop, patios and 6-by-6-foot timber walls while we graded the back yard and roughed out the pond area with a skid-steer. On Day 3, after loading two 20-yard dumpsters and separating the topsoil for later topdressing, we started trenching, burying 4-inch corrugated pipe to pick up surface and roof water and cutting a 4-foot-deep trench from the center of the pond daylighting at the back corner of the property. We plumbed a cast-iron, 4-foot gate valve to 4-inch Sch40 PVC drainpipe for the bottom drain to make pond maintenance easy, then backfilled and completed the grading. After a full day with a plate compactor to settle the subsoil and compact 4 inches of stone screenings, we started with laying the lower stone patios, then built the perimeter walls outlining the bed adjacent to the house.
Since the only access was through the step area, we next had to install the four largest steps from the high side, working the skid-steer back up the hill as we built the stairs from the bottom up. On Day 5 we built the pond (see Pond Particulars below). For the next four days we concentrated on integrating the pond into the hardscaping, building the coping up to support the edge of the patio and create the tall back wall of the pond, finishing the center patio, the waterfalls and the rest of the stream. The uphill wall of the stream retains the edge of the upper landing, which we built starting on Day 10 across to the top of the lower stairs. We started the last flight of steps on Day 12, with integrated dry-laid side walls alongside for plantings to soften the base of the house wall. Day 16 we finished installing a trench drain at the head of the stairs and polymeric sand in all the joints, to eliminate runoff and washout issues, and cleaned up the property.
Pond Particulars
The pond has a shelf for plants and safe entry/exit that’s 18 inches deep and 18 inches wide except under the waterfall, with vertical walls to keep out the many local raccoons and herons. The pond drops to 3 feet with a 4-inch bottom drain at the center, connected to the previously buried drain line. A 2-inch line tee’d into the drain line lets the Atlantic Water Gardens Oasis Skimmer draw debris and leaves automatically into the bottom drain, where it can be “flushed” by opening and closing the 4-inch valve. The large diameter pipe handles leaves and muck with ease, eliminating the need to ever drain the pond down for cleaning.
[box] John and Edwin consulting before the build and, top right, looking up from the Sunning Circle.[/box]
We installed the 45mil EPDM liner over underlayment, carefully collecting the wrinkles into two vertical pleats, leaving the rest of the liner smooth—an important step when leaving the liner visible. The bare black liner makes the pond look deeper, shows fish off better and makes cleaning and maintenance a snap, with no gravel to trap debris. With the bottom drain collecting the heaviest gunk before it can get into the filtration system, an Atlantic Oasis FilterFalls and a small upflow bog keep the pond clean and clear. We specifically chose the FilterFalls because we can easily add up to 6 Matala mats and additional biomedia in the future as the pond matures and fish grow. An Atlantic TW6000 asynchronous pump pushes 5,000 gph over the falls for under 500 watts, making the pond as affordable as it is attractive.
Time and Materials
The three-man crew was on the job 16 days total. The materials ran almost $12,000, roughly a third of the $36,000 project. Our customers asked for a budget plan, so we suggested a liberal schedule that gave us the freedom to work on the project three to four days at a time over the course of eight weeks, allowing us to complete other projects during the late summer and early fall. We agreed on payments that carried over into winter, for income when we need it most.


That right there is a magnificent backyard transformation.
Thanks Ryan! We had fun doing it, John and Lindsay are great folks to work with.