As a Pond Pirate at Bellas Aquatic Gardens, I enjoy creating ponds that look larger than life, even when they are small. Considering the subtropical climate we have in South Florida, I can’t help but put a tropical stamp of approval on each of my pond construction build outs and designs. When I sit down to map out my thoughts, I love to sketch a rough blue-print and create conceptual drawings so I can envision the beauty I am going to get my hands on.
My Own Pond Evolution
It all starts with a vision. Once there is a clear picture, the fun begins. Building a concrete pond is in no way an easy task, as there are many components that go into making a well built one. Even more so, many pond builders think of concrete ponds as a box with no movement. I have managed to prove time and time again that concrete ponds can be made in any shape, form and depth you so desire. Concrete ponds are often square or rectangular in shape as formal ponds, but as a Pond Pirate, giving a concrete pond a little flavor is definitely on my to-do list.
The original pond had a liner with concrete overlay. It had a good run of about 16 years (with the occasional facelift), but ultimately as my construction style changed, so did my vision of an ideal pond for my backyard. The second time around, my heart was set on a concrete pond with a twist of tropical Zen and functionality. The space was quite small, and the live oak in our yard was in the way, but I was determined to make an exceptional work of art. With the right equipment, I broke ground and ripped out the old pond. I made sure to dig deeper to create the adequate space and depth I needed for my koi to thrive.
In South Florida, there are strict building regulations when it comes to concrete structures, and even more so when water is concerned. Knowing this, my construction background went full throttle. Any body of water having a depth of 24 inches or greater falls into the category of swimming pool construction. Building these bodies of water requires meeting all the necessary rules and regulations to ensure you have a sound product. Some of these regulations, for example, include fencing around the body of water, self-closing latches on the fences around the property and even anti-entrapment drains. Keeping all these rules in mind, I relied on my skill set to make sure this pond would not only comply with our strict guidelines, but also last a lifetime.
Proactive Plumbing
When building a concrete pond, rough plumbing is your very first step (after digging your hole, of course). Plumbing of a pond is as important as the circulatory system in your body. You always need to make sure you measure twice and cut once. Calculate all your fittings, pipe lengths and placement as a failsafe for your returns and intakes to fall exactly where you need them staged. The best glue I have found to use in this industry is a heavy-duty gray and medium gray PVC glue. When applying this glue after using PVC cleaner and primer, it facilitates more work time, taking longer to cure so you have more wiggle room to line up everything correctly.
With everything glued in place and all your pipes staged, you are ready to put your work under pressure. Pressure-testing your plumbing is crucial to do before you begin framing your steel. Sealing your return and intake lines with caps and installing a pressure test kit, including a pressure gauge and hose bib, you will be able to fill your lines with water and compressed air to guarantee there are no leaks in your system. After 24 hours of maintained pressure, you may proceed with the work.
Make sure you keep your lines pressured during all your construction. Any accidental breaks on your lines will be noticed right away and will be much easier to repair. Attempting to fix a leaky pipe under a concrete structure is extremely difficult, especially when you have no idea where it is.
Framing your pond correctly is another important component to building a concrete pond. This is what holds it all together and gives strength to the concrete. No. 3 rebar is the industry standard in South Florida. How you place it makes all the difference. Rebar should always be at a maximum spacing of 10 inches off center. I prefer to position them every 6 to 8 inches. This may seem excessive, but I honestly feel that the integrity of the pond heavily relies on the strength of its structure.
>> Related Content | An Unnecessary Battle between Concrete and Pond Liner
Concrete and Liner are teammates

Where you embed the rebar is also an important note to remember. I have learned that embedding the rebar on the upper half of your concrete work from the ground is what provides the necessary strength to hold the tons of pressure caused by the volume of water you are putting in it, as well as the overall weight of the whole pond. It reduces the chances of the concrete cracking and losing water.
Make it Pour!
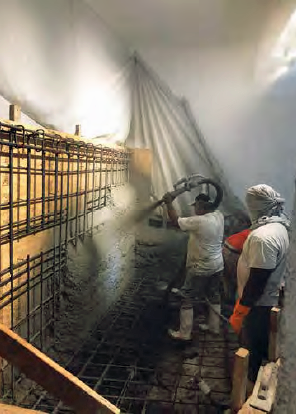
Once all your rebar cage is set and installed, you are ready for your pour. When pouring concrete, we used 3,500-psi concrete and a shotcrete pump. Using the shotcrete method — a hydraulic concrete pump and large air compressor — we created a compacted concrete installation. This method projects the concrete at high velocities onto the surface due to the force of the compressed air being ejected from the nozzle. We poured 6 x 8 inches on the walls and 8 x 10 inches on the floor.
After about two days of shooting concrete, we began the process of water-proofing. After many years of trial and error, I have found the most effective waterproofing systems to be Basecrete and Flexcrete, when applied correctly. Prepping your surface is key to a seamless application. Thoroughly cleaning the surface from all loose particles, dirt, oils and any other contaminants makes a world of difference. Your product is only as good as what you apply it to. Pressure-washing and acid-washing your surface before application is the best way to go to make sure the surface is as clean as possible to apply your first coat. Applying three coats of the water-proofing membrane with a 24-hour dry time between each layer will guarantee a watertight structure.

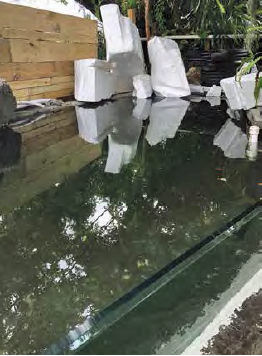
After the very last coat of your water-proofing has been applied, you have to wait about a week for it to fully cure. This is the best opportunity to fine tune all of your details, from the pumps and filtration connections to the rocks you will be staging on your pond. I decided to make the look my own, creating all my hardscape out of EPS foam and vertical concrete carving mix. This allowed us to really carve into the space and develop the area as desired.
A main perk to using faux rock in your installation is simply the art of manipulation. You can create any shape that suits your style and even defy gravity. The opportunity to create the perfect rock for my waterfall was there, and I had to go for it. Don’t be surprised when you make a mess while using this method. You have to literally get in the mud and toss it up and around to fill every void. Make sure to cover your entire workspace with protective tarp as a failsafe from damaging the waterproofing you have just recently applied.
A Touch Above the Rest
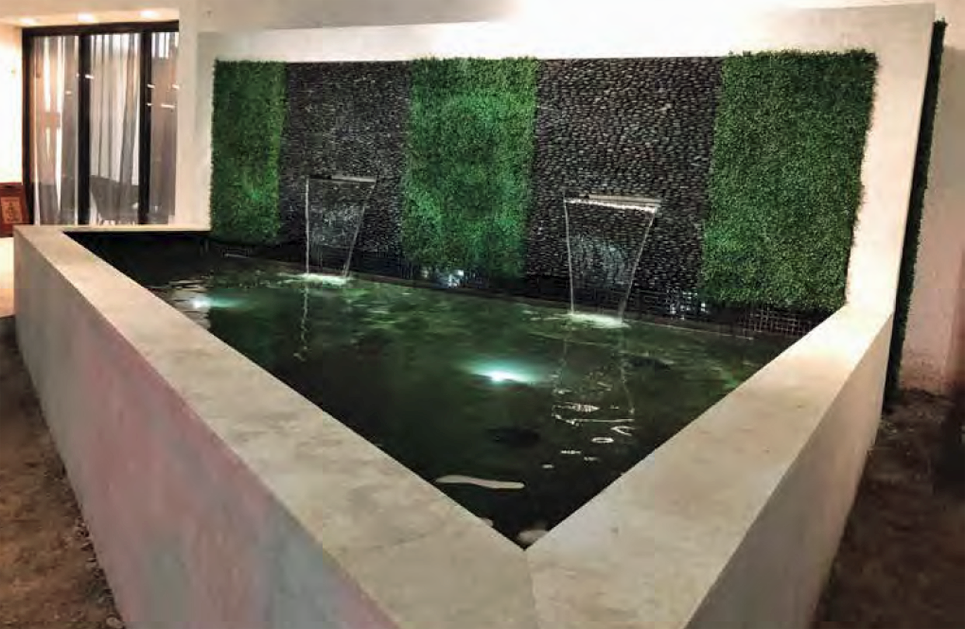
Your mess has been cleared, with waterproofing fully cured. Now, you finalize your pond with finish, right? Not if you have a few extra tricks up your sleeve. My vision for this pond included something special that would draw people in and leave them awestricken. A viewing glass window that was 2 feet high and 4 feet long would become the icing on the cake, elevating it from ordinary to over the top. Dealing with glass is a very delicate procedure, especially when it is 1-inch-thick Starfire Glass. We suspended the glass with ¼-inch stainless steel bolts that were embedded in the face of the pond. Using the bolts provided the extra support and required strength to seal it to the concrete walls. We used a rubberized polyurethane to seam it together.
We plastered the pond with Onyx Diamond Brite pool finish to give the illusion of depth and make the pond more comfortable for the fish. This finish is an exposed aggregate finish that we polished until the cream of the plaster surfaced. This was the exact texture we needed for the inside of our pond so that there would be no rough edges where the fish could scratch themselves.
Make it Green
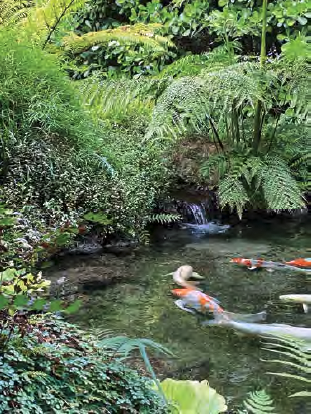
Ready for water, ready for fish…but the look still doesn’t seem complete. You need to add some color to your paradise. Complement your pond with a variety of foliage. I let my love for plants go wild as I shopped for aroids, philodendrons, bamboo grass, bromeliads and ferns. Every crevasse, every corner, every nook and cranny were laced in greenery. This provided even more movement as the plants began to flourish in their new home.
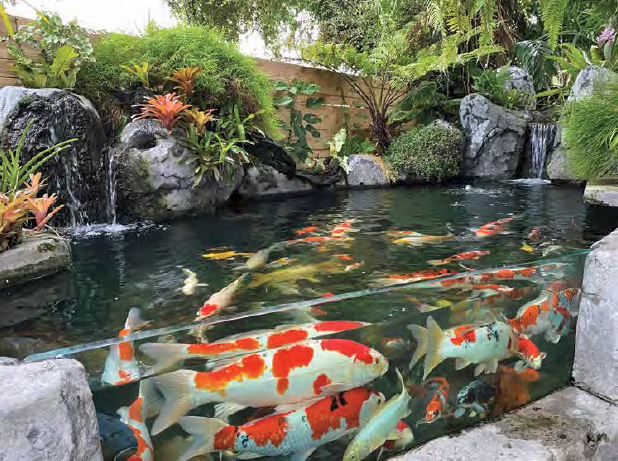
Before adding fish, it is always a good idea to allow your pond to cycle, which can take anywhere from four to six weeks. At any point in this cycle, your ammonia, nitrites and nitrates can skyrocket and create an ugly situation if fish are already in there. I learned the art of patience during this time, because I wanted to see my pond up and running. I would highly recommend introducing a few test fish to see how they fare prior to adding all your babies, just to confirm your pond is ready to house your pets. My love for koi over the years has grown so much. I wanted my pond to have variety and color, and as there are many different classifications, it is very difficult to fall in love with just one type. There are Sanke, Showa, Hi-Utsuri and Kujako, just to name a few. I also wanted shades of blue, so I chose electric blue ahli cichlids to give the pond an extra touch of color I would not be able to obtain with just koi.
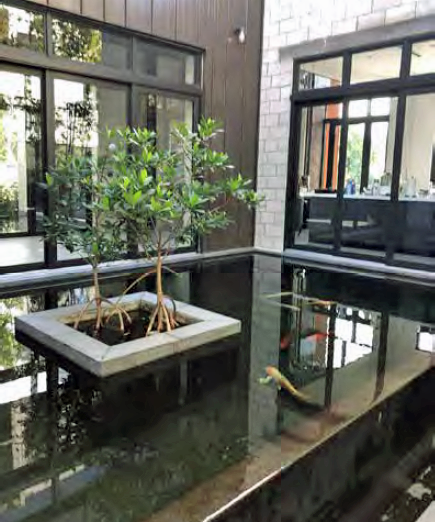
For me, this pond has not only been a personal goal for myself and my building skills, but it was also my chance to create paradise in my own backyard. I come home in the late afternoon after a hard day’s work and just sit in front of my pond. My babies have learned to line up in front of the viewing glass to greet me when they hear the sound of the back-door closing, just waiting for a fistful of food to fall in the water. This has become my safe space — my therapy, if you will.
All piratey things aside, I hope this will inspire anyone to take a chance and try something new. Open a new chapter and create something other than your run-of-the-mill liner pond. It never hurts to think outside the box!


Hi, I absolutely love your pond design! I have been looking for one of the machines you used in order to blow in the concrete and can’t find it anywhere.
Where would I be able to rent something like that? I live in Milwaukee, Wisconsin. Would love to know and get some tips from you. Thanks a bunch and have a great night.
Darlene 262-347-7015
Hi Darlene
The equipemnt used is a concrete pump connected to a highway compressor. Check around to see if there are contractors or any concrete company up there that might use either the shotcrete process or gunite in your area.
If you have any other questions, feel free to give us a call at here at Bellas Aquatic Gardens.
We love in South Florida. We have a concrete koi pond (about 700 gallons) with a rubber liner. The problem is when it rains a lot the high table ground water seeps through the concrete and pushed the liner inward. Do you have any advice?