Ever since Aquascape released the RainXChange system and introduced rainwater harvesting to the realm of water-feature building, I’ve wanted to use this concept in one of my installations. Alas, living in Austin, Texas, where there’s lots of solid rock underground, I’ve never had that opportunity. It was just never a cost-effective way to go. So when I got the call from a general contractor saying that she had a customer who was interested in such a system to go with a pond and waterfall design, I didn’t get my hopes up. I figured that I could build the pond, and they would end up going with aboveground cisterns for the rainwater catchment.
To my surprise, I was wrong. This customer’s house was on the side of town that doesn’t have solid rock under it, and I was finally going to get my chance to build such a system.
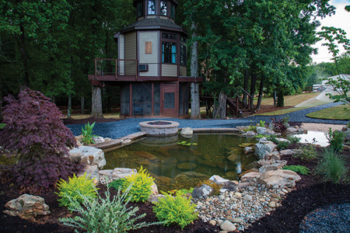
The old deck was coming out, and before the new one would be built adjacent to the pond, stream and waterfalls that we were about to create, we would be installing a system that would allow the homeowners to capture and reuse more than 4,000 gallons of the free wet stuff. The new deck would be constructed on top of our rainwater storage tank, making it completely hidden so that it would not detract from the beautiful scene we were about to fabricate.
Since it was our first time installing an underground system (other than for disappearing waterfalls), I researched some of the equipment that was available for just this task. I know that I would need some sort of Blox and a pump to pull the water from the underground tank we would create. I wanted to use some sort of pump vault as well, because at the time, the clients had thought that they liked the idea of a submersible pump for some reason. I happened to flip to the back of the Atlantic Water Gardens catalog to their rainwater harvesting section and found the mother lode. Not only did they have the EcoBlox, but they also had an external pump, a vault, downspout filters, and even a gauge that we could install on the top of the vault so that we could determine how much water was in the tank. I already liked the EcoBlox above any of the other Blox I’ve used in the past because they lock together, have rounded corners and are stronger.
So, being that we are Atlantic Professional Contractors, I decided to use their entire system, knowing that help was just a phone call away if I were to need it.
The materials were ordered and arrived in a couple of days. I was surprised to find that unlike Firestone, Carlysle doesn’t make that last fold in their liner. So, Mando and I ended up at the freight company to pick up this roll of liner that’s over 10 feet long and weighed around 900 pounds. It was sleeting, and the forklift driver quickly grew impatient trying to help us load this giant, heavy thing onto the trailer and went back inside where it was warm. We struggled with that liner for 40 minutes or so before we decided to cut the pallets from under it and use small sections of PVC that were in the trailer to roll it in there, Egyptian-style. It worked! And we were soon on our way to the job site.
Our first task was to assemble the EcoBlox — all 136 of them. We created a contest to see who could put them together correctly the most quickly. It didn’t take nearly as long as I thought it might, and we were soon antsy to start digging. Luckily, we were able to use all the excavated soil on the project, as we were going to raise part of the waterfalls 4 feet off the ground. But before we could dig, we had to create a massive wall to hold the soil. Some of the boulders that went into the wall were so big that they were tipping our 7,000-pound excavator. Hanging a couple of guys off the back of the machine helped us balance out the weight just enough to get it done.
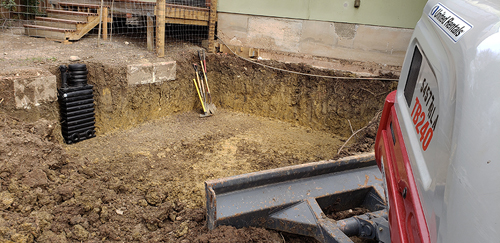
Once the base of the wall was complete, we were ready to dig. The soil was moist, sticky, yucky, nasty clay, and we were going 4 feet deep! Did I mention it was sticky? As I was digging out the soil, Mando was using the Ditch Witch to move it inside the wall we had built, and our two new guys, Carlos and Robert, were using hand-tampers and a vibrating plate compactor to smash it flat. Once we had the excavation done, the guys tried their best to make the bottom flat and smooth. However, the wet clay was quickly drying to a consistency closer to concrete than soil. So, we used some decomposed granite to create the smoothness on the bottom that we were seeking. We didn’t want any hollow cavities under the basin. We installed underlayment both before and after the liner was placed to protect it. Even though EcoBlox have rounded corners, we didn’t want to take any chances of puncturing the liner, as we would never again have access to this area in case of a liner breach.
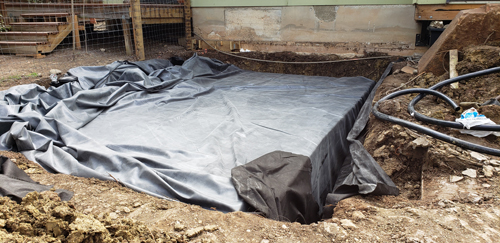
We placed the 136 double-stacked EcoBlox in the excavation and wrapped them with underlayment and liner. We added the pump vault and ran pipes from three downspouts into the vault. We also installed a pipe in the vault to feed the pump. We used a check valve on it so that the pump wouldn’t lose its prime. Next, we backfilled the sides of the excavation around the Blox. Then, we buried the entire basin under more than a foot of soil, leaving only the top of the vault exposed. By the time we were done, you couldn’t really tell that we had done anything at all. The ground looked about the same as it did just after the old deck was removed. Only now, it was hiding a secret!
We stubbed up and capped the output pipe until after the new deck was built. We also had to finish building the pond and waterfalls because the new deck would be constructed to mesh with the rocks along the side of the stream and a sitting boulder that we had placed beside the pond. Once the pond was operational, we were almost finished. The guy that built the deck was a real artist, and it took him a few weeks to be finished with his part of the project. When he was done, we went back with fingers crossed and hooked up the external pressure pump to the pipe that was now protruding through the deck. It was our first time doing this, and we weren’t sure exactly how this pump was supposed to work, or if it would even work at all. We primed the pump and plugged it in. To our delight, it worked immediately! It was at that point that we realized that this pump required a hose bib to shut it off, as a geyser soon erupted from the top of the pump.
But, it worked, and that was the main thing. After a quick trip to the nearby Home Depot, voila! The entire system was finished and worked perfectly. And because of our record rainfall this spring, the entire tank was already full with 4,300 gallons of water. Overall, this was a great learning experience, and I can’t wait to do it again! I’ll have to write another article sometime about the pond and the raised waterfalls that wrap around the corner of the house. Stay tuned!