Rock formations and geology have been of intrigue to me for most of my life. I am awed by the extreme curvatures, rifting and deformation of solid rock layers commonly seen along the interstates in the Rocky and Appalachian Mountains.
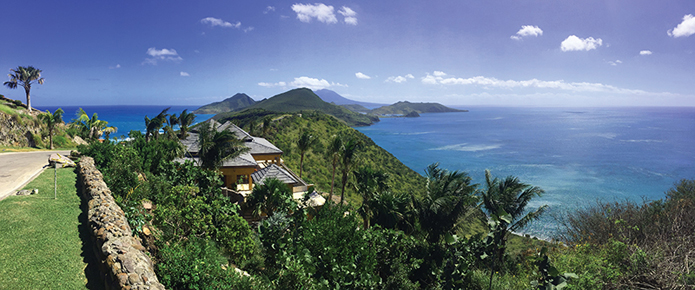
Recently it was requested that I construct a boulder water wall at a private residence in the Caribbean.
Insidious Igneous

My past experience from projects in the Caribbean told me that the local boulder material looked a lot like granite but was actually a blend of basalt and other minerals that came together during oceanic plate movement and volcanic activity. The weathered boulders — those that have been exposed to eons of saltwater, hot sun and a windy environment — tended to develop a hard but brittle outer layer, something similar to an egg shell. The problem with these particular boulders is that the outer layer, when hit, bumped or under pressure of a sling, can delaminate, leaving the boulder looking molted.
Knowing these boulders were going to receive rough treatment during truck loading, transporting and unloading, I anticipated that the best fit for the client’s goals would likely be boulders that had been excavated and stockpiled — if we could locate a source. My next consideration, knowing that projects on these volcanic islands tended to be on very steep, if not extreme hillsides, was how difficult it would be to access the site. My two major concerns were locating a work space reasonably close to the water wall site where we could stage and prepare the boulders, and then determining how to get the boulders, tools and materials to the water wall site.
Initial Ascent
My first look at the project reaffirmed that the home site and road leading to it were extremely steep. I’m not exaggerating when I say that this was probably the steepest concrete road in a subdivision I have ever encountered.
How steep was it, you ask? It was so steep that the resident workers suggested that I keep moving and not look up as I walked up to the house. “Just look down at your boots,” they said. “Keep putting one foot in front of the other. You will know when you have arrived at the house when you see other workers on their knees or sitting down, catching their breath.”
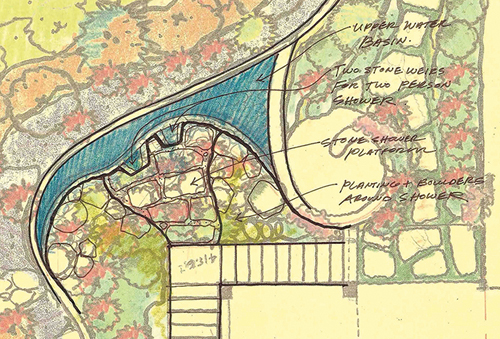
So, having developed enough common sense over the years, I listened to the local advice. Although my leg muscles were burning when I arrived at the front door of the house, I survived the uphill trek. After catching my breath, I was introduced to the general contractor, who proceeded to lead me down sloped walkways and switchback steps, around a few corners, and down another series of steps to a narrow landing area on the ocean side of the house. Standing there in full sunlight was an 11-foot-tall, 27-foot-wide, curved concrete terraced wall just waiting for something special to happen to it. At the top of the wall was a long upper discharge basin, and at the base of the wall, a lower catch basin and plumbing ran to the equipment room.
Naturalization
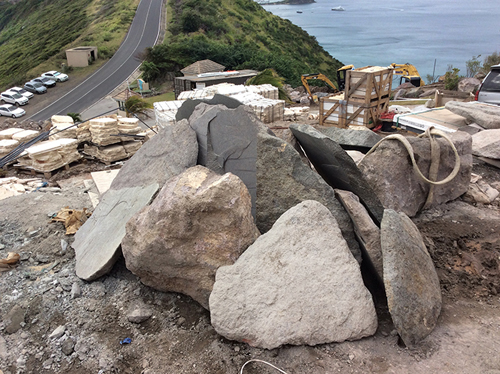
After we looked over the work area and got a feel for the scale and challenges of the water wall, our next step was to search the island for suitable boulders. Fortunately for my client, a few years before, there had been an airport expansion project, which created massive piles of boulders of various sizes and shapes that were cast aside as contractors looked for suitable material for making concrete. Unfortunately, none of these boulders were as weathered as I had hoped, so our task became more focused on searching for boulders that had more interesting shape characteristics and were suitably contoured for the water wall.

As we searched for boulders, it was important to find specimens that were not too thick, since the concrete water wall, basins and the landing in front of the water wall were already in place, and the space for this water wall was much narrower than I would have preferred. Because of these conditions, we needed to find the thinnest boulders possible to help us limit how far the finished boulder water wall and the splash off the wall would extend onto the landing area. After spending time at the first boulder stockpile, it quickly became obvious that it was going to be a challenge to locate large, suitably thin boulders that could be mounted onto the wall in their original shapes. The best option, we ultimately determined, was to find the most interestingly shaped boulders of various sizes and cut off the back sides of the boulders, leaving us an approximately 12-to-16-inch-thick veneer.

We still had to develop a plan to acquire and transport the selected boulders and to order and ship tools and materials to the site. We sat down with the general contractor and laid out our proposed construction plan. Armed with a plan of action and an executed contract, we departed the island and headed back home to put our plans into action.
Approximately four weeks later, we arrived back on-site equipped with the proper manpower, tools, materials and supplies. A dozen of our selected boulders had been delivered, so we began by rinsing off caked-on dirt and positioning them with the preferred faces clearly exposed, which allowed us to determine which portions of the boulder were to be removed. Our typical method of cutting off large amounts of boulder material is to use gas-powered, diamond-tipped chainsaws that are specially designed for cutting concrete and rock with optional-length bars that range from 12 to 24 inches long. For cutting rock, we have found that it is best to use the shortest bar possible that can accomplish the cut, since the chains themselves are quite expensive — not to mention the fact that holding onto the saw for the entire cut can be quite taxing. Our goal was to remove the back halves of the boulders by making two long cuts along opposite sides of each boulder.

If we were fortunate, and if we could control how the boulder came apart and settled to the ground after a complete cut, we would end up with a pair of desirable and useable boulder faces.
After a number of boulders were sawn and the sections carefully laid flat and face-down upon wooden supports, we cut channels that were 2 inches deep and 4 inches wide across the back sides of the boulders. We core-drilled a series of 1-inch-wide, 4-inch-deep holes in the channeled area to allow for mounting bracket bolts. After a thorough cleaning of the steel channel brackets, bolts and the new surfaces on the boulders, a high-strength, slow-cure epoxy was applied to all the mating surfaces. The components were bonded together and held securely in place throughout the epoxy-curing process.
Crane Strains
Our next challenge was to locate a crane for the heavy lifting. During our initial boulder search, it was obvious that there was a number of relatively new and substantially sized cranes on the island, so it never crossed my mind that securing a crane for our project would be an issue.
Well, there was an issue, but it didn’t involve crane availability. Remember that incredibly steep road leading up to the house — the road that would either kill you or make you stronger? It turns out that neither human nor heavy crane can easily navigate the incline. Each of the owners of the preferred cranes refused the work. The largest crane we could ultimately locate and hire for the work was a boom crane mounted on a flatbed truck, which had significantly less lift and reach capacity than we felt we needed. Since this was our only option, we had to find a way to make it work.

With the truck crane on-site, our next challenge was the actual positioning of the crane as close to the work area as possible. With the incline of the two-lane road in front of the house so steep, the crane had to work itself into a position that was perpendicular to the road. The outriggers on the uphill side of the crane had a single sheet of plywood under them, while the downhill-side outriggers required several feet of stacked blocks and flat boulders just to levelize the crane.
When crane day arrived, after several lifting attempts, we found that we had to position the larger-boulder sections as close as possible to the back corner of the crane before they could be lifted off the ground. Since these larger sections were at or close to the capacity of the crane, we kept the boulders mere inches off the ground as we eased them around to the back of the crane, down the hillside, over the concrete wall, and finally near the base of the water wall where they could be set. Once we had a number of the boulders relocated, we could more easily move and work with them to determine their best mounting positions.
Growing Ambition
Over time, I have learned that there seems to be an unspoken, natural progression of boulder installation, where the most critical boulder — often the largest boulder — needs to be set first.

Once that key boulder is placed properly, it sets the stage and serves as the visual cue for all other boulders to follow. It also happens to be the boulder that tests the crane’s capacity and the operator’s skill.
With the first few large boulder veneer sections finally dry set onto the concrete wall, the homeowners not only had their first glimpse of the newly designed water wall, but they also had a new vision of the water wall’s potential.
“Why not cover the entire water wall with large boulders and feather the edges into the peripheral wall-covering materials?” they suggested. It actually was a great concept, with the end result looking much more natural and realistic. This idea would also allow for many more areas of cascading water across the entire wall. Fortunately, this was the client’s dream home, and the fact that the new design changed the magnitude of effort by tenfold did not deter them.
When building boulder walls like this, the work has to proceed in sections, starting at the base to allow the epoxy and mortar to cure properly before the next series of boulders are installed. To allow this, we had to plan the general patterns and sequences of future boulders on the wall to ensure that a visually balanced, random-like placement was accomplished. Due to the fact that we were using a slow-cure epoxy, our cycles of work lasted approximately three to four weeks and consisted of selecting, preparing and installing 10 to 15 large and medium-sized boulders (2-by-3 up to 3-by-8 feet) at a time.
Ready for Flow
After several months, the water wall was assembled, and it was time to test the pumps and weirs for the very first time. For this step, it is best to start off with a minimal amount of water flow to ensure the water in the upper basin is distributed properly.

In this case, it was important that the three primary, distinctly separate waterfalls revealed themselves adequately. After these initial adjustments, a gradually higher and higher flow of water is provided to ensure the water wall can be tuned for various flows and visual effects.
Water walls are a beautiful addition to many environments, bringing sound, motion and even interaction into the space. When the desired effects are natural looking, the water flow is adequate and properly balanced, and the auditory level is appropriate to the space, the effect can be stunning.
Safety First
As a final thought and word of caution, for a water wall to be used and enjoyed by people, it also must be done safely. Boulders used within the wall must be mechanically secured properly to the wall structure without any internal fractures or stress cracks that may split and come apart in the future. Once all safety and design issues have been addressed, the water wall can present that “wow” factor that your clients will enjoy for many years to come and love to share with others.
David B. Duensing, a long-time industry expert and educator, created Aquatic Construction Services, LLC in 2006 specializing in combining natural stone, living water and his clients’ dreams to build unique and exceptional aquatic features throughout the Americas, the Caribbean and abroad.

