Concrete and mortar have been favored by pond construction and fountain builders since the Roman Empire, and the formula has changed little in the past 2000 years. Limestone and clay are mixed, heated and ground to the silky powder we call cement. Concrete is made by adding water, sand and gravel to the cement, while mortar refers to a finer sand and cement mixture used for bonding brick and stone.
Our modern formula was first cooked up on a stove in 1824 by British inventor Joseph Aspdin, a real ‘kitchen chemist.’ He named it Portland cement for its similarity to stone from the nearby Isle of Portland, but it’s basically the same stuff that built Ancient Rome.
Properly mixed and applied, under the right conditions concrete can last a very long time – the intact, magnificent roof of the Pantheon is still the world’s largest unreinforced concrete dome almost two thousand years after it was built. Roman aqueducts and fountains built two millennia ago are still in daily use today. That said, concrete is NOT a “set it and forget it” material. There are a number of requirements to be met if it is to last.
Cement and Water
Portland is hydraulic cement, meaning it hardens and cures upon contact with water, but the exact process is so complicated that we don’t fully understand it even today. The proper amount of water is critical in mixing concrete – too little won’t fully hydrate the mix, leading to an uneven cure and too much will weaken it. The curing process doesn’t stop with mixing, either. Concrete needs to be kept evenly moist for as long as feasible after pouring to develop its full strength, at least 3 days, but it will continue to strengthen for a year or more if kept moist.

Foundations for Concrete Structures
Concrete has tremendous compressive strength, capable of supporting thousands of pounds per square inch, but doesn’t bend or stretch very well, so the most critical requirement of any concrete structure is a proper foundation, set on undisturbed soil that will not move or settle. In colder climes footings must be set below the frost line to avoid movement during freeze-thaw cycles, usually 3 to 4 feet below grade.

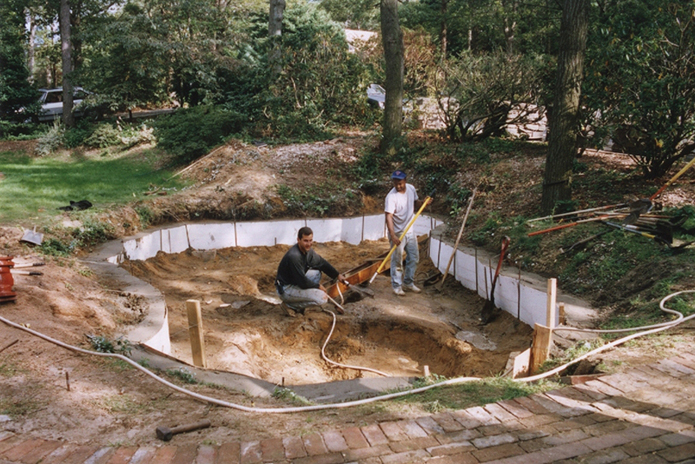
That may sound very deep, but if we’re considering the expense of concrete to start with, then we’re generally talking about a more elaborate pond, perhaps a koi pond where the deeper the water is, the better. Most koi ponds are deeper than the frost line, into undisturbed soil, so the depth of the footing is often of no great concern. We’ll usually dig out the pond as carefully as possible first, leaving the walls vertical, then we’ll excavate the trench for the footing at least 8˝ deeper than the rest of the pond, always below the frost line and at least 12˝ wide, to provide a solid, stable base that’s a little wider than the walls.
We pour the footing level and set some kind of ‘key’ to lock the walls to the footings. This can be as simple as regularly spaced rebar rods set into the wet concrete, or a groove in the top of the footing that the wall can lock into. An 8˝ x12˝ footing may sound like overkill, but it ensures the walls will stay straight and solid and support any load likely to be set on them, and with 8˝ walls the 12˝ wide footing provides a 4˝ shelf that the floor will key into later.
Waterproofing
There are three different ways I know of to waterproof the concrete pond, all starting with the solid foundation just described.
The first method is the conventional way to pour a fully waterproof concrete shell. The pond is excavated, a footing poured, the appropriate reinforcement rods and wire set in place and forms built. Latex or acrylic waterproofing solutions are added to the mixing water, to close the pores in the concrete and eliminate seepage through the walls. The concrete must be carefully mixed and vibrated into place to eliminate air bubbles, and the additives can be costly, but in warm climates where frost isn’t an issue this method works very well. Although the entire shell of a good-sized pond can be poured all at once by an experienced crew, we prefer doing the footing first, then pouring the walls, then the floor, sealing the seams between the three elements with waterstop gasketing. The flexible gasket is set on the footing before the wall is poured on top of it, sealing the joint from the inside as the gasket swells on contact with water. We’ll place an expansion joint vertically on the inside of the wall and a second gasket on that 4˝ shelf at the base of the wall before the floor is poured, to form an elastic seal that allows for expansion and contraction of the floor. The coping is set on top of the walls with a simple, strong, waterproof mortar made by mixing one 45lb. bag of thinset to two 70lb. bags of Type S mortar, a great mix I first heard about online from Doug Hoover of Aquamedia (many thanks for giving this great formula away for free!) This method of pond construction is effective, permanent and fully waterproof as long as there are no cracks, so it’s ideal for the Southern States and the West Coast. It isn’t optimal where freeze-thaw cycles are a concern.
Burying a flexible liner inside a concrete wall offers advantages over either method alone. In contrast to straight concrete, seams and small cracks cannot leak, so integrated gaskets, waterproofing additives and coatings are unnecessary, and freeze-thaw cycles are no longer a concern.
The second method dispenses with the cost and additional labor of integral concrete waterproofing by applying a waterproofing coating on the inner surfaces of the pond after the shell is constructed, and it works with either poured shells or with cinder block construction. There are many types of coatings, ranging from liquid EPDM rubber compounds to two-part epoxies to cement-based slurries to simple paints, so there’s a waterproofing compound for every job. The more elastic preparations bridge small cracks and even tolerate a small amount of movement, so they can be very forgiving and are often used to waterproof leaking existing concrete ponds. The key to these applications is proper surface preparation, so the manufacturer’s instructions must be strictly followed. The more stable the base, the better the coating will perform, so this method of pond construction also works best where winters are mild.
Burying a flexible liner inside a concrete wall offers advantages over either method alone. In contrast to straight concrete, seams and small cracks cannot leak, so integrated gaskets, waterproofing additives and coatings are unnecessary, and freeze-thaw cycles are no longer a concern. In contrast to liner ponds, the waterproof EPDM or PVC membrane is fully encapsulated between geotextile layers surrounded by concrete, permanently protected from sunlight, weather, wear and vandalism, so it’s ideal for harsh conditions or public water feature construction sites.

Although liner and geotextile is an additional expense over plain concrete or cinderblock, it is usually comparable to the cost of acrylic additives or two-part coatings, and typically less expensive than sprayed polyurea foam, and it involves little additional technical expertise. This isn’t brain surgery. On the contrary, this simple, obvious method is easier and more tolerant of adverse conditions or less-than-ideal preparation, so we’ve found it adapts well to any jobsite.
Hybrid Liner/Concrete Pond Construction
We tried, with some success, to simply skim-coat EPDM liner with a couple of inches of cement, but found the simple way wasn’t so simple – the liner was vulnerable to penetration from sharps in the ground, tree roots and even shifting soils that settled and exposed the membrane, not to mention those hideous destructive juggernaut, rodents (hint: Chip and Dale do bite).
Nowadays, we’ll build outer walls on a solid footing just like the first two methods, either pouring or mortaring cinder block in place; the type and thickness depend on the application. If we’re going to pour the walls, the soil can serve as the outer form for the pour if we’re careful and cut the walls vertical.
If we’re going to use block we make the excavation a little wider all the way around so there’s a little room to work: we’ll backfill after the walls are set. We always use galvanized wall reinforcement, like Durawall, between our courses of cinderblock and we fill each course with concrete – the small additional expense adds tremendous strength and resistance to displacement. The walls don’t come all the way to the level of the water surface; we stop 8-10˝ below the intended water level to create a Rock Shelf for the natural rock coping to come. Once the walls are in, we backfill and level the soil behind them to create a broad shelf for the coping (and any Perimeter Bogs we might install behind the coping).
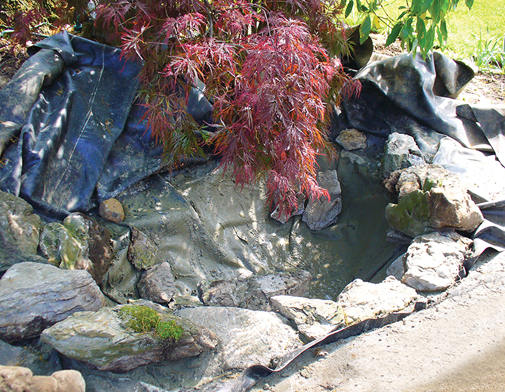
We’ll be pouring the floor last, but we need to grade the floor out now so we can cover the entire excavation – floor, walls and Rock Shelf – with a non-woven 6oz. geotextile, leaving plenty of extra to pull up behind coping and bogs to above water level. Our waterproof liner, usually 45mil EPDM, goes over the geotextile, again leaving enough above the walls to cover the shelf then come up another foot to well above the water line. We could cover the liner directly with concrete at this point, but we’ve found it’s both safer and much easier to cover the liner with another layer of geotextile, not just for protection, but because cement sticks to it like crazy, even vertically.
The final step is to cover the liner/geotextile ‘sandwich’ completely. Depending on the job, we may build both inner and outer walls of 4˝ block, or spray cement stucco over the geotextile, 3/8˝ at a time, with our little Tirolessa sprayer that we absolutely love for smaller jobs. Finally, we dump out a rich, fiber-reinforced mix on the floor a wheelbarrow at a time and trowel the sides and bottom smooth, working our way out as we go. We leave at least 3˝ on the floor and 2˝ on the walls, and the ‘gorilla hair’ type poly fibers help keep the cement in place even if it cracks or crazes on the surface.
Consider creating a design or covering the floor with pebbles if the job warrants a special touch – it’s always appreciated, even if it’s rarely seen after the pond grows in. The coping goes in last, with the largest stones mortared in with that 140lb mortar/40lb thinset mix.
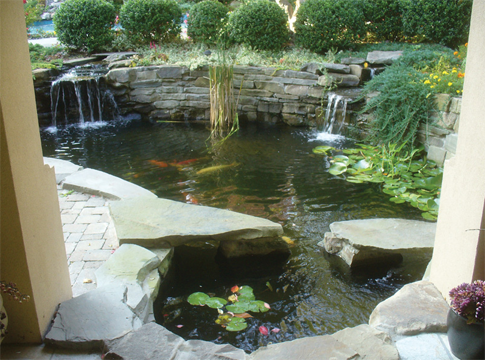
For koi ponds, we lay in smaller stones dry in front of Perimeter Bogs, simple gravel beds 6 to 8˝ deep on 2 to 3-foot wide areas of the Rock shelf with the liner pulled up at the outer edge, so water can filter in and get filtered by the roots. Look up Active Bog Filtration for some really cool ideas to keep koi ponds algae-free.
Winding up
There isn’t enough room on these pages to go into greater detail, but I hope I’ve given you the idea that concrete can be a great option.
In warmer areas concrete ponds:
- can be built and waterproofed many different ways, so they’re easily adaptable to most sites;
- provide strong, lasting, virtually limitless structure regardless of soil conditions;
- can be shaped and smoothed to make cleaning easier and safer than liner ponds;
- properly constructed and waterproofed, are very low maintenance;
- offer resistance to damage and vandalism that bare liner, or even gravel-bottom ponds cannot match.
There’s no reason to shy away; concrete is far easier to use than ever before, thanks to advances in additive technology and delivery systems, and adding an impermeable liner makes ponds that are literally bulletproof. We’ve used this technique for ponds from 250 to 10000 gallons, and I’m pretty sure it’s adaptable to much more than I’ve run into. Give concrete construction a try next time you need a long-lasting, low maintenance, virtually indestructible pond.
Contact me at demi@atlanticwatergardens.com with questions; I’d be delighted to help.


Very informative
Thanks dude
Great advice
Good luck in future
Bless mj
Thanks for finally writing about pond construction with concrete POND
Trade Magazine. Really iked it!
Great post about pond construction. You just need to make sure that you use a sealer as concrete is very susceptible to cracking and can easily make the water alkaline. A pond liner over the concrete is the best solution to insure it doesn’t leak.
Is there an easy way to take the old liquid epdm off and put on epoxy back on
I had no idea. THIS is what I needed to read.
I may have to change a way I don’t want to, for details in my “Frog Pond.” Having made a point of living in warmer climates than where I’ve decided to stay; there are big differences I’ve only guessed at.
You’ve done me a huge service to write and make this article available.
Thank you,
Marg Hefner
Great information. Thank you, that is exactly what I needed to know. I build swimming pools and was trying to figure out a way to incorporate concrete and a liner into my koi pond I’m building. Thanks again.
Thanks so much for the information. It’s nice to know there are still caring people willing to help others. Trying to pour my own 10 foot diamter above ground fountain basin in St. Louis and didn’t know how to handle the freeze thaw cycles to prevent cracking of the basin. This is the perfect information. Please know your a real Godsend. (Called everyone in the area asociated with fountains but none really knew how to do this. They normally just put a small basin on 6″ of gravel and pour a pad.)
Thank you! I’ve recently come across an issue whereas hawks are trying to swoop down and grab the koi fish therefore ripping the liner.
Was a really good read, thanks for the advice!
Very informative and helpful article. I have had two ponds with just the liner and maintenance has been a bear. As well as it constantly springing leaks. We have a huge husky in our neighborhood who likes to play in the pond on a hot day and leaves punctures in the lining.
Anyhow, I am reshaping and changing aspect of the pond and decided that this tine we are going to pour concrete. Thanks for the helpful article.
It must of been meant to be. So glad I accidentally ended up on this page reading your article. It was super helpful. I almost gave up searching for an article on concrete ponds not plain liner ones. These girls thank you!
Glad you liked it, Kimberly. Hope you and the girls have fun with your project! Be Well, Demi
Wow! This was incredibly helpful! We purchased a property with TWO concrete koi ponds, non-functioning. Have gotten the pump systems up and working, but were struggling with the concrete ponds. No one in our area will touch them; having to do all the work ourselves. Your article is just what we needed to read. Thank you!
Yesterday I had a man who says he builds ponds tell my contractor and myself, that we DO NOT need a Footer. He said, in a monolithic pour (all at once sprayed Shotcrete) it is all self supporting. My previous “contractor” (actually a scam artist), was installing the Rebar by driving the verticals into the ground (amongst other not to code work). This consultant/new man says that is OK, is good to be in the soil, That is how he has done it for years.
My counties Engineers say the Rebar is not allowed to touch the soil, must be UP in the concrete Footer. That is FL and County Code.
I worked on building a Coast Guard Base in north Florida in the late 1960s and all our rebar was set OFF the Ground, the slab’s Rebars were on ‘Chairs’, (small metal props to lift the rebar 3″ off the soil) which will thus position the rebar INSIDE the concrete. I have not worked in the concrete aspect of construction for decades, but firmly believe this supposed Pond contractor is ill advising my current Contractor and myself.
I believe, regardless of whether the cement is poured into forms or shot (as in Shotcrete) a minimum 8″ thick by 12″ wide footer is mandatory.
Since the mid-1960s, the American Shotcrete Association refers to both forms of pneumatically applied concrete as shotcrete, with one called wet-mix and the other dry-mix. However, the pool and spa industry continues to refer to them colloquially as Gunite (dry mix) = dry until mixed at the nozzle and Shotcrete (wet mix) mixed wet before entering Shotcrete hose.
ANYONE OUT THERE HAVE EXPERIENCE IN BUILDING A LARGE CONCRETE POND (mine will be 15,000 gallons). Your responses will be greatly appreciated (via this site or to surf1939@gmail.com).
Thank you to all wet (and dry) animal lovers.
Thanks for the informative article. I have just built a small pond with interior dimensions of 2.5′ by 5′ with a waterfall. The concrete is very smoothly finished. I wonder why I have to seal it all? I like the concrete surface work that my crew did and don’t want a heavy epoxy or slurry sealer covering it up. It rained a week ago and water filled the pond an inch and didn’t go anywhere for days. I don’t plan to have fish or plants in the pond either. The only problem I can think of is that the rebar could corrode, expand and crack the concrete. If I do need to seal it, is there a lighweight penetrating or no sheen sealer I could use?
From Demi Fortuna:
Hi Ralph.
Sounds like you and the crew did a great job. Concrete is not waterproof and water will sleep through the pores eventually unless they are sealed. Apply any good quality silicone based clear sealer, look for matte finish. Those seal without changing the appearance of the concrete. It will just look wet, and will protect the rebar. These sealers typically need to be reapplied periodically, but underwater the natural biofilm that will develop on the walls will also seal the pond eventually. Just don’t power wash it. 🙂 Good luck and Happy Holidays, Demi
Thanks for so informative article. I intend to build a large fish pond measuring 1000 ft x 400 ft. with concrete lining along the brims and polythene sheet covered by sand on the floor, in a sandy soil in temperate region of Pakistan. May you suggest me how to make it durable and leak-proof, to save from future damages.
Your response from Demi:
Hello Zahoor
Assuming that the polyethylene sheet is a single piece and absolutely waterproof, the best advice I can possibly offer is to protect the liner as best you can. I would recommend using layers of geotextile fabric to cover the liner if possible. I have had very good results using 30 mil very low density LLDPE liner in Mexico, under relatively extreme conditions, without any problems. Polyethylene tends to stretch very well, which means that settling usually isn’t much of an issue, but PE is very easily cut by sharp objects, even sharp rocks. I would strongly recommend lining the excavation with geotextile, or if cost is an issue, with a layer of sand, before installing the liner. If cost is not an issue, my personal preference is cover the PE with another layer of geotextile before applying the layer of sand. The rigors of raising and harvesting fish can easily displace the sand on the bottom, exposing the liner to sunlight or damage. The geotextile “sandwich” will return the greatest possible longevity of your investment.
Good luck with your project!
Thank you for writing this article; it is helpful. I do have a questions regarding the use of an expansion joint between the base and the walls with the waterproof coating (second method). Would you advise covering the joint material directly w/the coating product or a different method? I am replacing an existing fiberglass shell over 3/4 in plywood that lasted about 5yt. The pond is 1,200 gallons with three tiers: 1ft, 2ft and 3ft deep. I live in north Texas and water temperatures in the pond reaches low 80’s during the summer no freezes during the winter due to water flow. The greatest width for the base is 2.5ft with surface area of ~12ft^2. Do you think expansion joints are even necessary in the construction?
From Demi Fortuna:
Dear Frank
Actually, in your neck of the woods the summer heat is probably more of a factor than the cold. However, as you noticed, since the water temperatures only reach into the 80s, the water is buffering the worst of the summer air temps. With a range of perhaps high 30s to high 80s, no icing, no heat extremes, I would agree you probably don’t need expansion joints for such a small pond. If you want to be sure, use chopped fiber reinforcement in the concrete you make or order. It’s inexpensive and guards against cracking and displacement.
Good luck with your project! Be well, Demi
Passionate about Water!
Hi- thank you for writing this great article. One that I should have read before construction. My contractor upgraded my old small pond-5×7. He first poured sand onto the dirt floor to level it, then put in 45 ml rubber liner. He used brick for the edging and brought the mortar about 3-4 inches down the walls. No sealer was used. Now when the pond is full to top it looses water until it’s water level is below the mortar. How would you suggest to fix this? Thanks very much.
Hi Betsy
Well, there might be two different things going on here, and the answer to which one could depend on how long it takes the water to drop below the level of the mortar. The obvious possibility is that you have a small perforation at the level the water settles at, or a spot where the liner is very low, hidden in the mortar. This is what I would look for if the pond leaks down quickly, in less than a days or a matter of hours. To detect a low spot or hole (or holes), I recommend the use of a commercial leak detecting solution. Look up “Swimming Pool Leak Detection Dye” in your favorite browser. The dye, available in multiple colors (I like yellow), is a viscous liquid you apply with a syringe around the edge of the pond, on a dead still day, with the fish if there are any removed for the test. With the pond filled up, apply the liquid slowly, an inch or two out from the edge, in an unbroken ring all the way around the inner perimeter. As the heavier dye sinks, it will be drawn out with the leaking water, creating an arrow right to the leak.
If, however, the water level drops slowly, you may have a wicking situation, where the concrete is absorbing the water and literally pulling it out of the pond. The water will drop to the lowest point the mortar extends and stop there. You may have to remove the bricks and mortar to find and fix the water loss, or you may have to live with the lower level if it’s too difficult to cut back the mortar without damaging the liner.
Good luck with your pond! D
Hi, just wonder if I mix 45 lbs thinset and 2, 70 lbs type S mortar, it will make that mix waterproof for a waterfall job for southern California.??
Thanks for the help.
Hi Carlos
I’m not sure. The porosity will depend on both the mix and how it’s applied. To make it as water retentive as possible, I’d recommend using an acrylic admixture like Acryl 60 and chopped nylon or poly fibers in the water to help keep it from cracking. Hard troweling the surface when the mix is “thumbprint hard” will help close the pores on the surface. I’d also recommended a ‘wet’ cure, where the mix is kept constantly damp while curing. Let us know how it works!
This was incredibly helpful! thank you for writing this great article. I have just built a small pond with interior dimensions of 3,2′ by 6,4′ . A pond liner over the concrete is the best solution to insure it doesn’t leak.
The content is stimulating and engaging, Thanks for sharing!
Fencing Companies Denver
Thank you for writing this great article. Waiting for the spring to do it in my courtyard.
You’re welcome! Good luck on your project.
Thank you, this was such a helpful article! I’m in Ontario, Canada, planning a Hybrid liner/concrete pond. It is not a koi pond, just a rectangular water feature with a letter box fountain, measuring 5 x 12 feet and 2 feet deep. Would you recommend sandwiching the pond floor as well as the walls? The layers in your caption suggest a compacted soil base. Do you find that is enough to keep the chipmunks out? They are very determined to have the yard the way they want it. It is an ongoing battle with them.
From Demi Fortuna:
Hi Natasha,
Some nuisances are headaches for all of us, and chipmunks are up there on the list. I harden the soil under most of my projects these days because I’ve had problems with both rodents and roots. I’ll put a layer of concrete underneath if the job is small enough that a quick pour is easy. That’s what we’d do in your situation. It doesn’t have to be structural, so we don’t go 4″ thick, but we will use chopped fibers in a rich two-inch pour (two parts sand to one part Portland) to keep it from cracking or displacing. On larger jobs where we have sand at the bottom we’ve raked in Portland to the substrate and watered it down as a labor-saving alternative to a wet pour. Coincidentally, there’s a shallow 3000 ft2 pond we’re re-lining this week coming up where we were thinking of trying concrete canvas, a dry blanket that would be applied in pieces to the floor before hydrating. Regardless of the type of protection, we harden all our features whenever feasible, it beats the alternative. Good luck with your project!