
About five years ago, I received an interesting call from someone asking if we were in the business of building ponds from existing swimming pools. This person’s children were now grown and no longer used the pool for swimming. She was paying her pool guy to clean and maintain a pool that was now seldom used, and she had always dreamed of having a fish pond. I had actually never done this before, but as I’m always looking for new ways to expand my knowledge of pond construction, I replied, “Yes, we can do that!”
Since I still had a few weeks left on an existing project, I had some time to do a lot of research. Most of the websites I found seemed to suggest just putting koi fish in a pool and calling it a pond, despite the fact that there were no aquatic plants, boulders or any interesting levels and contours — not to mention that light-blue concrete bottom!
Think Outside the Pool

After coming to the realization that it would be almost impossible to attach the skimmer to concrete, I approached the customer and suggested that we completely demolish her pool and start from scratch. Luckily, she was very understanding that for this pool to look like a natural pond, we would have to use a rubber liner with natural rock and boulders.
Breaking Ground
We spent the first few days jackhammering her lovely pool into a pile of rubble. We didn’t have to completely remove the bottom of the pool; we just punched holes in the concrete for proper drainage. Next, we brought in many tons of screened topsoil to cover the bottom and sides. After thoroughly compacting the soil, we were able to begin the artistic phase of this conversion.
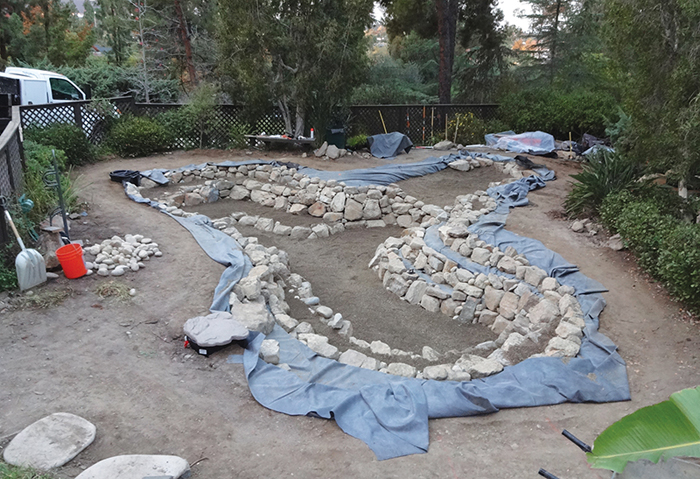
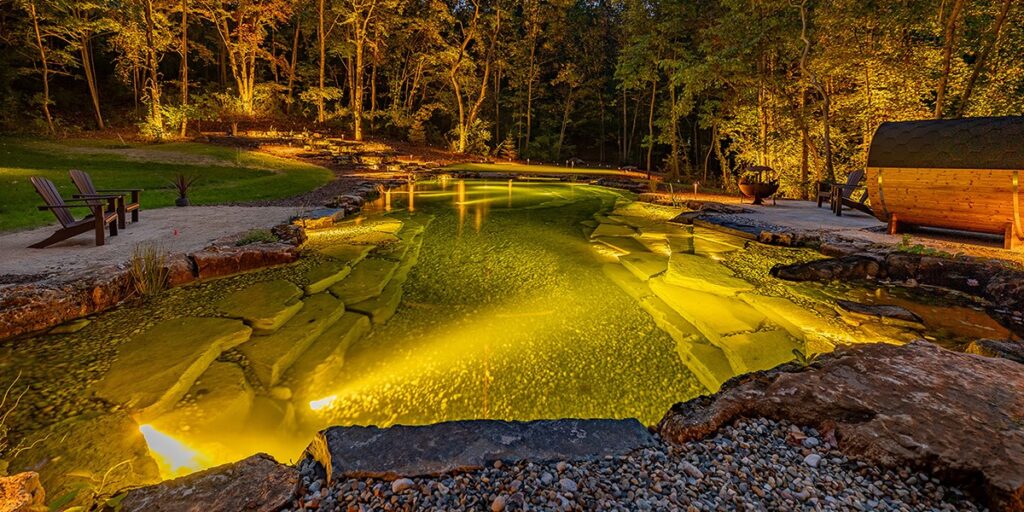
We started by carving out different contours to the sides and bottoms. Since this had been a fairly large pool, I had enough room to include a few terraces and a planting shelf around the perimeter of the pond. This would give me a place to plant the aquatic grasses, reeds and plants that I envisioned would make this pond look as natural as possible.
After getting the shape and depth of the pond the way I wanted, we installed a felt underlayment to protect the liner. It took seven of us to lift and install the liner. (How heavy can a rubber liner be, you ask? Actually, for this pond, we needed a 50-by-50-foot liner, which is just over 800 pounds!)
Once the liner was in place and attached, then came the back-breaking phase of rocking in the pond. Altogether we installed approximately 25 tons of rock and boulders. Since some of the drop-offs in the pond would be almost 3 feet, I had to use some very large boulders inside the pond. Trying to use rock that was too small for that height would just increase the risk of the wall collapsing later on. After completely rocking in the pond, we added a few tons of pebbles to cover the liner at the bottom. This would give the beneficial bacteria a place to colonize and break down the complex organic compounds in the pond sludge. Then came a few large boulders for the edges of the pond that would be big enough to for the owner to sit on and put her feet in the water.
Filtration
Considering the size of this pond, I decided to use two skimmers, one for each end of the pond. I used an Aquasurge 4,000-to-8,000-gph pump in each of the skimmers. These pumps come with a remote control, so the waterfalls can be easily adjusted, allowing the owner to enjoy the pond with low or high waterfall flows.
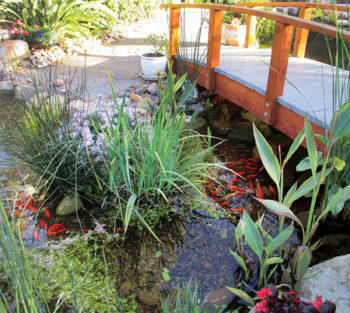
Another thing I wanted to incorporate into this pond was a wetland for added filtration. I chose a part of the yard that had never actually been a part of this space and constructed it there. This would soon become one of the customer’s favorite parts of the pond, since it gave her room to add her favorite pond plants.
Surprise Falls
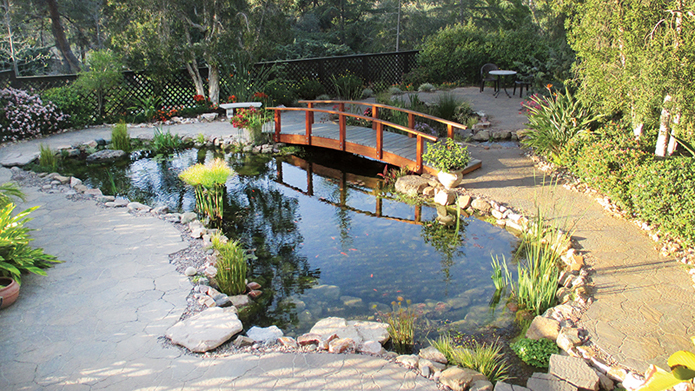
Things were really coming together at this point, and the customer was starting to get excited about how the pond was shaping up. I decided to install a small waterfall near the wetlands and a larger one at the base of the hill that the house was built on. As I stood back and envisioned the whole thing, I realized that if we could start the larger waterfall farther up the hill, she could also enjoy the water feature while sitting on her deck just outside her back door.
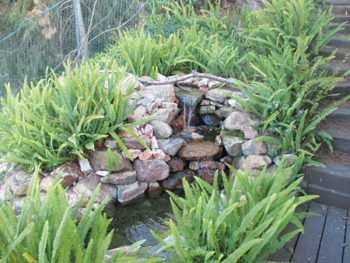
At this stage, the customer thankfully believed me when I said I wasn’t trying to deplete her bank account; I just wanted this to be the best water feature she had ever seen. With her blessing, we began to build a waterfall and stream that would rise about 15 feet higher than the original one. At the top, we placed our biofalls filtration unit, which branched off into two different paths. One led into a small, 4-by-6 pond that came right up to her deck. The other stream cascaded down into a group of waterfalls, which then led to the main stream that flowed right alongside the steps leading from her back deck down to the main pond.
Some of the boulders we used were between 300 and 400 pounds. After many hours of dragging them up the hill, we finally got to the easy part — putting as many hoses as possible into the stream and turning on the water! As the water was running, we planted our waterlilies and other plants. After a few hours of washing off the rock and boulders and filling up the pond, we were able to turn on the pumps and trim the excess liner from the edges.
The results were better than I had hoped for! My crew and I enjoyed the sound of waterfalls for the duration of the project. We installed pavers around the pond and into a patio sitting area near the wetlands. We also built a wooden bridge to span the narrow part of the pond that divided the wetlands from the deeper part of the pond. From this bridge, the customer now enjoys feeding her goldfish and koi.
It’s been several years now since this project was completed, and I am still able to periodically check in with the customer. I enjoy listening to her talk about how much she loves her pond and her fish. What was once a large pool that was rarely used is now a beautiful koi pond that is enjoyed around the clock!

I recently purchased a house with an oval-shaped swimming pool (Bixby Hill, Long Beach) and want an estimate to convert it to a small stream with a koi pond; which is low maintenance. Can you help to introduce reputable/experienced contractor?
Hello Jim…Congratulations to you and the pond contractors. Would you be willing to share your estimated cost to complete the project or share who the contractor was? We are wanting to do the same in the Central Valley of Ca. Pool size is approx. 20 x 40., but could be reduced. Thanks in advance