Polyurea is a spray-applied plastic coating that is applied with special equipment and training. But this article is titled “Preparing for Polyurea” because, as a pond builder, you most likely won’t be applying it yourself. The equipment and training required usually runs between $100,000 to $150,000 and sometimes more. With that kind of investment and training, you will need to be a polyurea spray technician, keeping the equipment operating as often as possible, to get a return on your investment. Coupled to that is the maintenance and upkeep. Letting the equipment set for long periods of time between jobs is costly.
Tech Specs
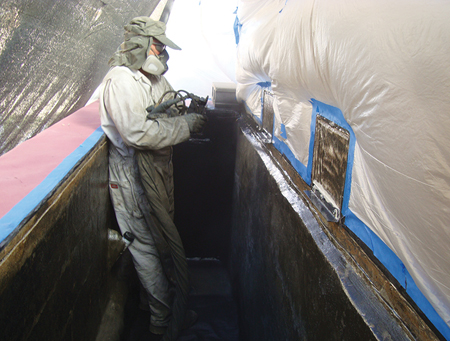
Polyurea is a two-part system delivered to the surface to be coated at approximately 200 degrees Fahrenheit and 2,000 psi by a specialized set of pumping equipment, heated hoses and a spray gun. The two parts (polyurea solids and isocyanate) are heated and metered together by the pumping system, reaching the spray gun through heated hoses that can be several hundred feet in length.
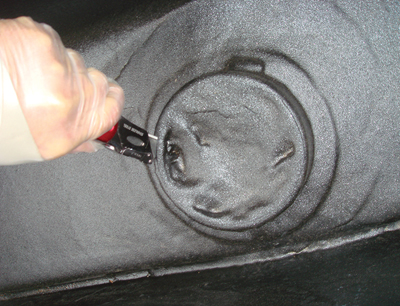

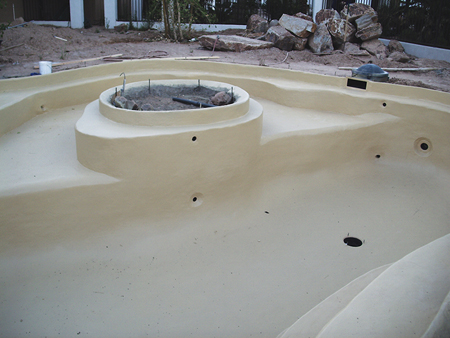
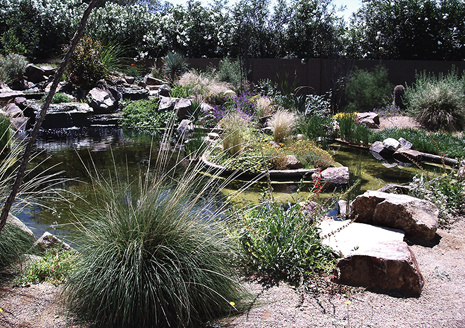
A professional cuts out the center of a flanged fitting (left) after polyurea has been sprayed. Polyurea allows waterproofing of shapes like islands and steps (middle and right) that cannot be accomplished with liner.
There are many polyurea formulas on the market for use in different situations and applications such as truck bed liners, roofing, decking, blast protection and armor plating, waterproofing, water containment, structural protection and more. Many of these formulas have plasticizers that provide specific chemistry for a particular application. The formulas used for water containment are generally pure polyurea formulas with no plasticizers.
Best Pond Practices Series: This is an installment of an ongoing, multi-part series. >> Click here to read more content on pond maintenance.
The beauty of using polyurea in pond construction is that it can be applied over virtually any shape or structure within reason, without any wrinkles or folds, and has an elasticity of approximately 400 percent. It can support tons of boulders without puncture and roots can’t grow through it.

Polyurea is not glue! It has a “Band-Aid stick” to most surfaces and must be mechanically clamped to all penetrations, just as you would when using EPDM liner. Pond-type skimmers, bottom drains, mid-water drains and returns are all produced with clamping flange faces for liner. These are perfect for polyurea. Top edges can overlap and be captured by the top cap or stone, just as you would with liner. Edge treatments can be accomplished with a ledge around the top, just as you would a plant ledge with stacked rocks and boulders hiding and securing the edge.
Almost nothing sticks to polyurea. In installations where tile or vertical stone needs to be applied up the face of a surface or wall, stainless steel lath is fused onto the face to create a grid surface for the mortar to bond to.
Designing for Polyurea
When considering polyurea, think and design around what the technician needs to accomplish your goal. Construct in a “polyurea-friendly” manner. Corners should be radiused and not left as a sharp, 90-degree shape. It can be difficult to shoot into sharp corners, so even a slight radius of a half-inch is an improvement. Penetrations should be 10 to 12 inches away from corners, floors or other structures to allow room for the spray gun assembly to be maneuvered. Columns and structures should be at least 18 inches apart and shallow troughs should be at least 18 inches wide for clearance. If a deep trough is created it needs to be even wider so the technician can manipulate the equipment properly.
Polyurea is usually applied in several passes to achieve a thickness of approximately 80 mils. The spray gun needs to shoot at 90 degrees to the surface, spraying “head-on” and not at an angle, to get an even coat. Spraying at an angle can cause runs, drips and an uneven coating.
Concrete Prep
When applying polyurea over concrete, the surface should have a “sidewalk” finish. Trowel the concrete surface as smooth as possible or parge the surface afterward to fill all the holes, gaps and imperfections. Polyurea will look like the surface it is applied to, so make it look nice, just as you would “Bondo” the body work on a car before painting. Use a product that will become very hard and not powdery or weak when applied thin. Some parge coatings can have a chemical reaction with polyurea and pinhole badly, causing an enormous amount of extra time to deal with. My personal favorite is Gray Bond-Kote by Super-Krete products. Always check with your polyurea applicator of choice before you apply any parge coating system.
The flanged surfaces of your penetrations of choice will have a number of screw holes that you will need to find later to attach the clamp ring. Place a finish nail in one or two holes, leaving the others open. Filling all the holes with nails makes removal and preparation for the ring difficult because polyurea is strong and hard to cut. Cutting just one or two nails out with a razor knife is easier, and once the first couple of screws are in place the other holes are indexed through the holes in the clamp ring. The screws will go right through the poly and into the holes in the flange easily. If the skimmer face is supplied with nuts and bolts or machine screws place a couple of screws in for indexing and cover the other holes with tape or paper dots. To install the faceplate, install the first two and mark the other holes to be cut out afterward.
Communicate for Best Results
Always be in contact with your polyurea technician before the project gets started. Preparing for polyurea means creating a project that the applicator can coat without a great deal of trouble. You are less likely to be charged for extra prep time by the polyurea technician if you do your job properly. Make sure you allow for the prep time in your bid. On gunnite or shot-crete ponds, let the crew know ahead of time what you expect from them. They are used to shooting around protruding piping that gets cut off later by the pool plaster crew. They will assume you want a rough surface for a plaster coat unless you specify otherwise. Ask if they can have a couple cement finishers on hand to trowel the surface as smooth as they can and be prepared to pay for that. Otherwise you will be parging the entire surface yourself after they leave to get the finish surface smooth enough for polyurea. This will be expensive and time-consuming. No matter how nice they make the surface, there will always be some prep to do around the penetrations and some nitpicking of small imperfections.
Once finished, the project will be waterproofed for a period of time far longer than any other coating currently available. After you’ve experienced polyurea you’ll start finding projects that you can use it on and expanding the way you design.

Can polyurea be placed over an existing liner in a pond?
Yes but it wouldn’t be pretty and you’d have to clean it really well. You’re better off just cutting the old liner out and having the polyurea applied over geotextile cloth that the applicator supplies. The cloth is very inexpensive and much cheaper than the cost of trying to clean up the liner.
How to establish whether the product has Plasticizer or not- is it mentioned in manufacturers data sheet?
Can pure polyurea be used for water bodies (Fountains) and swimming pools as well as sewage treatment plants as waterproofing – protective coating?
How do you protect the polyurea surface? Will screed protection followed by tile fixing with epoxy adhesive work for horizontal surface and vertical protection by directly applying epoxy adhesive followed by tile fixing in swimming pools and water bodies?
Will polyurea be affected by chlorine and hypochlorine in swimming pools?
Glad to know the answers.
Regards,
Jaswwinder